


Upper body
The upper body comprises a complex network of muscles responsible for a wide range of movements, stability, and strength. Key muscle groups include the pectorals (chest), deltoids (shoulders), latissimus dorsi (back), and the muscles of the arms, such as the biceps and triceps. However, beyond these more prominent muscles, there are several smaller, often neglected muscles that play critical roles in upper body function. These include the serratus anterior, which aids in scapular movement and stability; the rotator cuff muscles (supraspinatus, infraspinatus, teres minor, subscapularis), which are essential for shoulder stability and injury prevention; and the rhomboids and lower trapezius, which contribute to proper posture and scapular retraction. The brachialis and brachioradialis are crucial for elbow flexion but are frequently overshadowed by the biceps. Neglecting these smaller muscles can lead to imbalances, reduced functional strength, and a higher risk of injury, highlighting the importance of a balanced approach to upper body training.
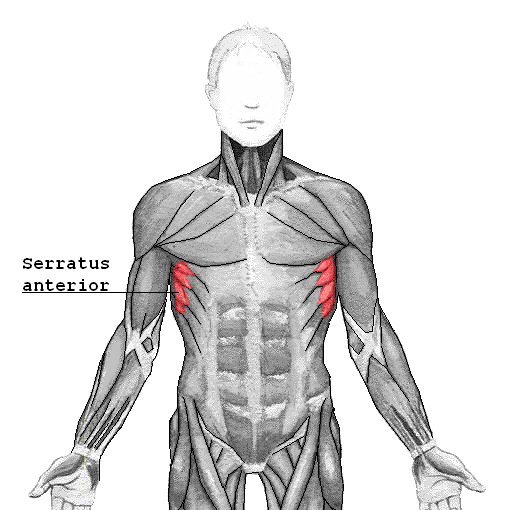
Serratus anterior
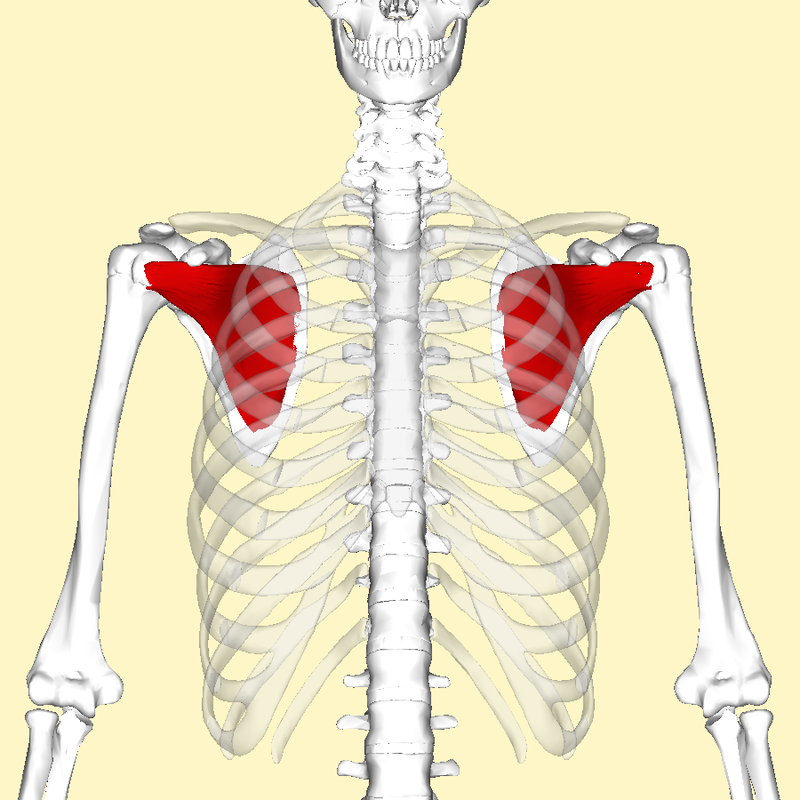
The serratus anterior is a crucial yet often underappreciated muscle that plays a vital role in the movement and stability of the scapula (shoulder blade). Located on the side of the chest, beneath the pectoral muscles, the serratus anterior originates on the upper ribs and inserts along the medial border of the scapula. Its primary function is to protract the scapula, allowing for forward movement of the shoulder, which is essential in actions such as pushing and punching. Additionally, it assists in upward rotation of the scapula, which is important during overhead activities. A well-functioning serratus anterior stabilizes the scapula against the rib cage, preventing winging of the scapula, a condition that can lead to shoulder dysfunction and pain. Despite its importance, the serratus anterior is often overlooked in traditional strength training routines, leading to potential imbalances and compromised shoulder mechanics. Strengthening this muscle can improve overall shoulder stability, enhance performance in pressing movements, and reduce the risk of shoulder injuries.
A highly effective exercise that specifically targets the serratus anterior is the Scapular Push-Up. Here’s how to perform it:
1. Starting Position: Begin in a standard push-up position, with your hands placed slightly wider than shoulder-width apart and your body forming a straight line from head to heels. Your arms should be fully extended, with your elbows locked.
2. Movement: Instead of bending your elbows as you would in a regular push-up, keep your arms straight and focus on moving your shoulder blades. Lower your body slightly by retracting your shoulder blades (bringing them together), and then push through your hands to protract your shoulder blades (moving them apart) as far as possible. This pushing motion should cause your upper back to round slightly at the top of the movement.
3. Contraction: At the top of the movement, focus on squeezing and engaging the serratus anterior by fully extending your arms and pushing your shoulder blades forward.
4. Repetition: Lower your body back to the starting position by retracting the shoulder blades and repeat the movement for the desired number of repetitions.
The scapular push-up is excellent for strengthening the serratus anterior, as it isolates this muscle and trains it to function properly during shoulder movements, enhancing stability and reducing the risk of shoulder injuries.
Rotator Cuff Muscles
The rotator cuff is a group of four small yet vital muscles—supraspinatus, infraspinatus, teres minor, and subscapularis—that play a crucial role in shoulder stability and movement. These muscles originate on the scapula (shoulder blade) and attach to the humerus (upper arm bone), forming a cuff around the shoulder joint. Each muscle has a specific function: the supraspinatus aids in lifting the arm away from the body (abduction), the infraspinatus and teres minor are responsible for external rotation of the arm, and the subscapularis controls internal rotation. Together, these muscles work to stabilize the shoulder joint by keeping the head of the humerus securely within the shallow socket of the scapula during arm movements. Despite their importance, the rotator cuff muscles are often neglected in traditional strength training routines, which typically emphasize larger, more visible muscles like the deltoids and pectorals. Neglecting these muscles can lead to imbalances, reduced shoulder stability, and an increased risk of injuries such as rotator cuff tears or impingement. Incorporating exercises that specifically target the rotator cuff is essential for maintaining shoulder health, improving functional strength, and preventing injury.
Supraspinatus
The supraspinatus is one of the four rotator cuff muscles, playing a key role in shoulder stability and movement. It is located in the supraspinous fossa, a small depression on the upper part of the scapula, and runs underneath the acromion (part of the shoulder blade), attaching to the top of the humerus (upper arm bone). The primary function of the supraspinatus is to initiate abduction of the arm—lifting it away from the body—especially during the first 15 degrees of movement, after which the deltoid muscle takes over. Additionally, the supraspinatus helps stabilize the shoulder joint by holding the head of the humerus firmly within the shallow socket of the scapula, preventing dislocation during various arm movements. Despite its critical function, the supraspinatus is prone to injury due to its location and the high demands placed on it, particularly in repetitive overhead activities such as throwing, swimming, or lifting. Weakness or injury in the supraspinatus can lead to shoulder pain, reduced range of motion, and compromised shoulder stability. Therefore, exercises that strengthen the supraspinatus are crucial for maintaining shoulder health, preventing injuries, and ensuring optimal performance in activities requiring arm elevation.

A highly effective exercise that specifically targets the supraspinatus is the Prone Shoulder Abduction. Here’s how to perform it:
1. Starting Position: Lie face down on a flat bench with your arms hanging straight down towards the floor, palms facing inward. You can hold light dumbbells or simply use your body weight if you’re just starting.
2. Movement: With your arm fully extended, slowly raise it laterally (to the side) until it is level with your shoulder, forming a “T” shape with your body. Make sure to keep your thumb pointing upward throughout the movement to ensure the supraspinatus is properly engaged.
3. Contraction: At the top of the movement, pause for a moment and squeeze your shoulder blades together to fully engage the supraspinatus.
4. Return: Slowly lower your arm back to the starting position with control, resisting the weight as you return.
5. Repetition: Repeat the movement for the desired number of repetitions before switching to the other arm.
The prone shoulder abduction is particularly effective for isolating and strengthening the supraspinatus, as it works the muscle in its primary function of initiating shoulder abduction. This exercise helps to build strength and stability in the shoulder, reducing the risk of rotator cuff injuries.
Infraspinatus
The infraspinatus is a key muscle of the rotator cuff, crucial for shoulder function and stability. It is located on the back of the shoulder, occupying the infraspinous fossa of the scapula, and extends laterally to attach to the greater tubercle of the humerus (upper arm bone). The infraspinatus is primarily responsible for external rotation of the arm, allowing the hand to turn outward. This movement is essential in many daily activities and sports, such as throwing, swinging a racket, or performing overhead lifts. Additionally, the infraspinatus contributes to stabilizing the shoulder joint by keeping the head of the humerus firmly in place within the socket during arm movements. Due to its specific role in external rotation, the infraspinatus is often underdeveloped compared to more prominent shoulder muscles like the deltoids, leading to imbalances that can predispose the shoulder to injuries such as impingement or rotator cuff tears. Strengthening the infraspinatus is vital for maintaining balanced shoulder mechanics, enhancing performance in activities that involve arm rotation, and preventing shoulder dysfunction.
An effective exercise that specifically targets the infraspinatus is the Side-Lying External Rotation. Here’s how to perform it:
1. Starting Position: Lie on your side on a flat surface or bench, with your upper arm resting along your side and your elbow bent at a 90-degree angle. Keep your elbow tucked into your side, and let your forearm rest across your abdomen. You can hold a light dumbbell in your hand or use a resistance band if you’re just starting.
2. Movement: Keeping your elbow fixed against your side, slowly rotate your forearm upward, lifting the dumbbell or band against the resistance. This external rotation movement engages the infraspinatus, which is responsible for rotating the arm outward.
3. Contraction: At the top of the movement, when your forearm is parallel to the floor, pause and squeeze the infraspinatus to maximize contraction.
4. Return: Slowly lower your forearm back to the starting position, resisting the weight as you return.
5. Repetition: Perform the desired number of repetitions on one side before switching to the other arm.
The side-lying external rotation is particularly effective for isolating and strengthening the infraspinatus, which is crucial for shoulder stability and injury prevention. This exercise is commonly used in rehabilitation programs to address shoulder imbalances and improve rotator cuff function.
Teres Minor
The teres minor is a small but essential muscle of the rotator cuff, contributing significantly to shoulder stability and movement. Located on the back of the shoulder, it originates from the lateral border of the scapula and attaches to the greater tubercle of the humerus (upper arm bone). The primary function of the teres minor is to assist in the external rotation of the arm, similar to the infraspinatus, and to help with the adduction (bringing the arm toward the body) of the shoulder. This muscle also plays a crucial role in stabilizing the shoulder joint by helping to hold the head of the humerus in the glenoid cavity of the scapula during various arm movements. Despite its important function, the teres minor is often overlooked in traditional shoulder workouts, leading to potential imbalances and increased risk of shoulder injuries. Strengthening the teres minor can improve shoulder mobility, enhance performance in activities requiring external rotation, and contribute to overall shoulder joint health by ensuring balanced muscle development and stability.
An effective exercise that specifically targets the teres minor is the Standing External Rotation with a Resistance Band. Here’s how to perform it:
1. Starting Position: Attach a resistance band to a sturdy anchor point at about elbow height. Stand sideways to the anchor point, with the side you want to work facing the anchor. Hold the free end of the band in the hand of the arm closest to the anchor. Your elbow should be bent at a 90-degree angle, with your forearm across your abdomen.
2. Movement: Keeping your elbow tucked into your side, slowly rotate your forearm outward, away from your body, against the resistance of the band. This external rotation movement directly engages the teres minor, which is responsible for rotating the arm outward.
3. Contraction: Continue rotating until your forearm is in line with your torso, feeling the contraction in the back of your shoulder.
4. Return: Slowly bring your arm back to the starting position, controlling the movement and resisting the pull of the band.
5. Repetition: Perform the desired number of repetitions before switching sides to work the opposite teres minor.
This standing external rotation exercise effectively isolates the teres minor, helping to strengthen and stabilize the shoulder joint. It is particularly beneficial for improving shoulder function and preventing injuries related to the rotator cuff.
Subscapularis
The subscapularis is the largest and strongest muscle of the rotator cuff, playing a crucial role in shoulder stability and movement. Located on the anterior (front) surface of the scapula, within the subscapular fossa, this muscle extends across the shoulder joint to attach to the lesser tubercle of the humerus (upper arm bone). The primary function of the subscapularis is to facilitate internal rotation of the arm, allowing movements such as bringing the hand toward the body or reaching behind the back. Additionally, it helps with shoulder adduction (pulling the arm toward the body) and extension (moving the arm backward). Importantly, the subscapularis provides significant stability to the shoulder joint by holding the head of the humerus securely within the shallow socket of the scapula, particularly during lifting and pushing movements. Despite its importance, the subscapularis is often undertrained, as traditional shoulder exercises tend to focus more on the external rotators and larger, more visible muscles. Weakness or imbalance in the subscapularis can lead to shoulder instability and increase the risk of rotator cuff injuries. Strengthening the subscapularis is essential for maintaining balanced shoulder function, preventing injuries, and supporting overall upper body strength and mobility.
An effective exercise that specifically targets the subscapularis is the Internal Rotation with a Resistance Band. Here’s how to perform it:
1. Starting Position: Attach a resistance band to a sturdy anchor point at about elbow height. Stand sideways to the anchor point, with the side you want to work facing away from the anchor. Hold the free end of the band in the hand of the arm furthest from the anchor. Your elbow should be bent at a 90-degree angle, with your forearm parallel to the floor and positioned outward from your body.
2. Movement: Keeping your elbow tucked into your side, slowly rotate your forearm inward, pulling the band across your body. This internal rotation movement directly engages the subscapularis, which is responsible for rotating the arm inward.
3. Contraction: As you rotate your arm inward, focus on squeezing the subscapularis at the end of the movement, when your forearm is across your abdomen.
4. Return: Slowly allow your arm to return to the starting position, controlling the movement and resisting the pull of the band.
5. Repetition: Perform the desired number of repetitions before switching sides to work the opposite subscapularis.
This internal rotation exercise is excellent for isolating and strengthening the subscapularis, which is a key muscle in stabilizing the shoulder joint and ensuring smooth internal rotation of the arm. Strengthening the subscapularis helps prevent shoulder injuries, especially in activities that involve repetitive internal rotation, such as throwing or swimming.
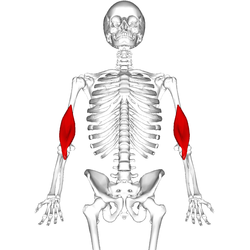
Brachialis
The brachialis is a key muscle located in the upper arm, lying beneath the biceps brachii, and plays a crucial role in elbow flexion. Unlike the biceps, which assist in both elbow flexion and forearm supination (rotating the forearm to turn the palm upward), the brachialis is solely responsible for flexing the elbow, regardless of the position of the forearm. This makes it a powerful and essential muscle for movements that involve bending the arm, such as lifting and pulling. The brachialis originates on the lower half of the humerus and attaches to the coronoid process of the ulna, the bone on the inner side of the forearm. Despite its significant role in arm strength, the brachialis is often overlooked in traditional upper arm workouts, which tend to focus on the more prominent biceps. However, developing the brachialis can lead to greater overall arm strength and a fuller appearance of the upper arm by pushing the biceps outward, creating a more pronounced arm contour. Strengthening the brachialis not only enhances functional strength but also contributes to a balanced and aesthetically pleasing upper arm.
An effective exercise that specifically targets the brachialis is the Hammer Curl. Here’s how to perform it:
1. Starting Position: Stand with your feet shoulder-width apart, holding a pair of dumbbells with your arms fully extended by your sides. Your palms should face each other in a neutral grip, with the thumbs pointing upward.
2. Movement: Keeping your upper arms stationary, slowly curl the dumbbells toward your shoulders by bending your elbows. Focus on lifting the weights using your brachialis, which lies underneath the biceps.
3. Contraction: At the top of the movement, when the dumbbells are near your shoulders, squeeze your brachialis to maximize contraction.
4. Return: Slowly lower the dumbbells back to the starting position, fully extending your arms while maintaining control over the weights.
5. Repetition: Perform the desired number of repetitions, ensuring that you maintain a steady, controlled movement throughout the exercise.
The hammer curl is particularly effective for targeting the brachialis because it minimizes the involvement of the biceps brachii, placing more emphasis on the brachialis muscle. Strengthening the brachialis helps increase arm strength and adds size to the upper arm, as this muscle is crucial for elbow flexion.
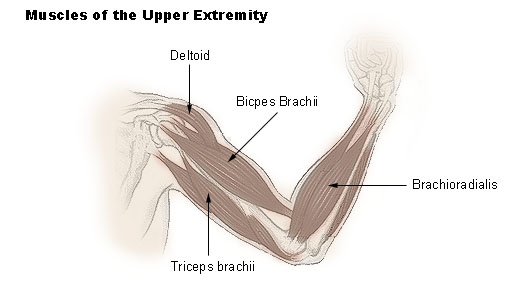
Brachioradialis
The brachioradialis is a prominent muscle of the forearm that plays a key role in flexing the elbow, particularly when the forearm is in a neutral position, such as during a handshake. It originates on the lateral ridge of the humerus, just above the elbow, and runs along the forearm to insert at the styloid process of the radius, one of the two main bones of the forearm. Unlike the biceps, which is more active during supination (palm-up movements), the brachioradialis is most engaged during movements where the forearm is in a neutral or slightly pronated position (palm facing down). This muscle is often underemphasized in traditional arm workouts, which typically focus on the biceps and triceps. However, the brachioradialis is crucial for balanced arm strength and functional grip, as it helps stabilize the forearm during lifting and pulling activities. Strengthening the brachioradialis not only enhances overall forearm development and grip strength but also contributes to more efficient and injury-resistant elbow and wrist function, making it an important muscle for both athletes and those engaged in manual labor.
An effective exercise that specifically targets the brachioradialis is the Reverse Curl. Here’s how to perform it:
1. Starting Position: Stand with your feet shoulder-width apart, holding a pair of dumbbells or a barbell with an overhand grip (palms facing down). Your arms should be fully extended, with the weights resting against your thighs.
2. Movement: Keeping your upper arms stationary and close to your body, slowly curl the weights upward by bending your elbows. Focus on lifting the weights primarily using the brachioradialis, which is responsible for flexing the elbow when the forearm is in a pronated (palm-down) position.
3. Contraction: At the top of the movement, when the weights are near your shoulders, pause and squeeze the brachioradialis to enhance the muscle contraction.
4. Return: Slowly lower the weights back to the starting position, fully extending your arms while maintaining control over the movement.
5. Repetition: Perform the desired number of repetitions, ensuring that your movements remain smooth and controlled throughout the exercise.
The reverse curl is highly effective for isolating the brachioradialis because the overhand grip minimizes the involvement of the biceps brachii, shifting the focus to the brachioradialis. Strengthening this muscle not only improves forearm strength but also contributes to overall arm size and grip strength, which is beneficial for various lifting and pulling activities.
Rhomboids
The rhomboids, consisting of the rhomboid major and rhomboid minor, are two important muscles located in the upper back, playing a crucial role in scapular (shoulder blade) movement and stability. These muscles originate from the spinal vertebrae (C7 to T5) and insert into the medial border of the scapula. The primary function of the rhomboids is to retract the scapula, pulling the shoulder blades toward the spine, which is essential for maintaining good posture and proper shoulder alignment. Additionally, they assist in downward rotation of the scapula, a movement important in actions such as pulling or rowing. Despite their importance, the rhomboids are often overlooked in traditional back workouts, which tend to focus more on the larger, more superficial muscles like the latissimus dorsi. Neglecting the rhomboids can lead to rounded shoulders, poor posture, and an increased risk of shoulder injuries due to imbalances in the upper back and shoulder girdle. Strengthening the rhomboids not only improves posture and shoulder stability but also enhances the overall function and aesthetics of the upper back, making these muscles essential for balanced upper body development.
Major rhomboids
The rhomboid major is a key muscle in the upper back that plays a vital role in scapular retraction, posture, and shoulder stability. This muscle originates from the spinous processes of the thoracic vertebrae T2 to T5 and inserts into the medial border of the scapula, specifically from the spine of the scapula down to its inferior angle. The primary function of the rhomboid major is to retract the scapula, pulling the shoulder blades toward the spine, which is essential for maintaining an upright posture and ensuring proper alignment of the shoulders. Additionally, it assists in the downward rotation of the scapula, which is important during movements such as pulling and rowing. Despite its importance, the rhomboid major is often undertrained in traditional back routines that focus more on larger muscles like the latissimus dorsi. Neglecting the rhomboid major can lead to muscle imbalances, poor posture, and increased risk of shoulder injuries due to weakened scapular support. Strengthening the rhomboid major is crucial for enhancing upper back strength, improving posture, and maintaining the overall health and stability of the shoulder girdle.
An effective exercise that specifically targets the rhomboid major is the Face Pull. Here’s how to perform it:
1. Starting Position: Attach a resistance band or cable to an anchor point at approximately face height. Stand facing the anchor point, holding the handles or ends of the band with both hands, using an overhand grip (palms facing downward). Step back until there is tension in the band or cable, and position your feet shoulder-width apart.
2. Movement: With your arms extended in front of you, pull the band or cable directly toward your face, focusing on squeezing your shoulder blades together. Your elbows should flare out to the sides, creating a 90-degree angle at the shoulder joint as you pull.
3. Contraction: As you pull the band or cable toward your face, concentrate on contracting the rhomboid major by bringing your shoulder blades as close together as possible. Hold this contracted position for a moment.
4. Return: Slowly extend your arms, allowing the band or cable to return to the starting position with control, while maintaining tension in your upper back.
5. Repetition: Perform the desired number of repetitions, ensuring that each movement is controlled and focused on engaging the rhomboid major.
The face pull is particularly effective for targeting the rhomboid major because it emphasizes scapular retraction, the primary function of this muscle. Regularly incorporating face pulls into your routine can improve posture, enhance upper back strength, and reduce the risk of shoulder injuries by promoting balanced development of the upper back muscles.
Minor rhomboids
The rhomboid minor is a small but important muscle located in the upper back, just above the rhomboid major. It originates from the spinous processes of the C7 and T1 vertebrae and inserts into the medial border of the scapula, near the spine of the scapula. Despite its smaller size, the rhomboid minor plays a crucial role in scapular retraction, pulling the shoulder blades toward the spine, and contributing to overall upper back stability and posture. In addition to retraction, the rhomboid minor assists in the downward rotation of the scapula, a movement necessary during pulling motions and activities that involve lifting. Although it is often overshadowed by larger muscles in the back, the rhomboid minor is essential for maintaining proper shoulder alignment and posture. Neglecting this muscle can lead to shoulder imbalances, poor posture, and an increased risk of injury, especially in the shoulder and upper back region. Strengthening the rhomboid minor can significantly improve scapular stability, enhance posture, and contribute to a more balanced and functional upper back.
An effective exercise that targets the rhomboid minor specifically is the Prone Y-Raise. Here’s how to perform it:
1. Starting Position: Lie face down on a bench or stability ball with your arms extended straight in front of you, forming a “Y” shape with your body. Your thumbs should be pointing up towards the ceiling, and your head should be in a neutral position, aligned with your spine.
2. Movement: With your arms straight and elbows slightly bent, slowly lift your arms upward toward the ceiling, focusing on squeezing your shoulder blades together as you raise your arms. This movement directly engages the rhomboid minor, which is responsible for retracting and stabilizing the scapula.
3. Contraction: At the top of the movement, when your arms are fully raised, hold the position for a moment, emphasizing the contraction in the rhomboid minor.
4. Return: Slowly lower your arms back to the starting position with control, resisting the urge to let them drop quickly.
5. Repetition: Perform the desired number of repetitions, maintaining control and focus on the rhomboid minor throughout the exercise.
The prone Y-raise is particularly effective for targeting the rhomboid minor because it isolates the muscles involved in scapular retraction and stabilization. By regularly incorporating this exercise into your routine, you can improve shoulder stability, enhance upper back strength, and contribute to better posture, reducing the risk of shoulder and neck discomfort.
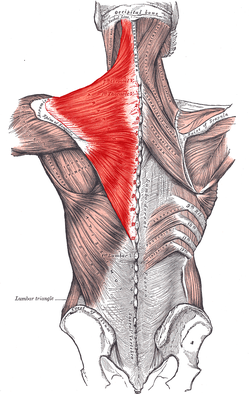
Lower Trapezius
The lower trapezius is a critical muscle located in the lower portion of the trapezius muscle, extending from the middle to the lower thoracic vertebrae (T4 to T12) to the spine of the scapula. This muscle plays a key role in the downward movement and stabilization of the scapula, as well as assisting in the upward rotation of the scapula during overhead motions. The lower trapezius is essential for maintaining proper shoulder alignment and posture, particularly by counterbalancing the often overactive upper trapezius, which can lead to muscle imbalances if not properly addressed. Despite its importance, the lower trapezius is frequently neglected in traditional upper body workouts, which tend to focus on more prominent muscles like the upper trapezius and deltoids. This neglect can result in poor posture, shoulder impingement, and an increased risk of injury, particularly in the shoulder and neck regions. Strengthening the lower trapezius is vital for achieving a balanced upper body, improving shoulder mechanics, and supporting functional movements, especially those involving lifting or reaching overhead.
An effective exercise that specifically targets the lower trapezius is the Prone Y-Raise. Here’s how to perform it:
1. Starting Position: Lie face down on a bench, stability ball, or an incline bench set at a low angle. Let your arms hang down toward the floor, with your thumbs pointing upward. Your body should be in a straight line, and your head should be in a neutral position, aligned with your spine.
2. Movement: With your arms straight and elbows slightly bent, slowly lift your arms upward and slightly outward to form a “Y” shape with your body. As you lift your arms, focus on pulling your shoulder blades down and together, engaging the lower trapezius muscle.
3. Contraction: At the top of the movement, when your arms are fully raised, pause and squeeze the lower trapezius, emphasizing the downward and inward pull of your shoulder blades.
4. Return: Slowly lower your arms back to the starting position with control, maintaining tension in your back muscles throughout the movement.
5. Repetition: Perform the desired number of repetitions, ensuring each movement is slow, controlled, and focused on engaging the lower trapezius.
The prone Y-raise is particularly effective for isolating and strengthening the lower trapezius because it emphasizes the muscle’s role in scapular depression and retraction. Strengthening the lower trapezius helps improve shoulder stability, posture, and overall upper back strength, reducing the risk of shoulder impingement and other upper body injuries.
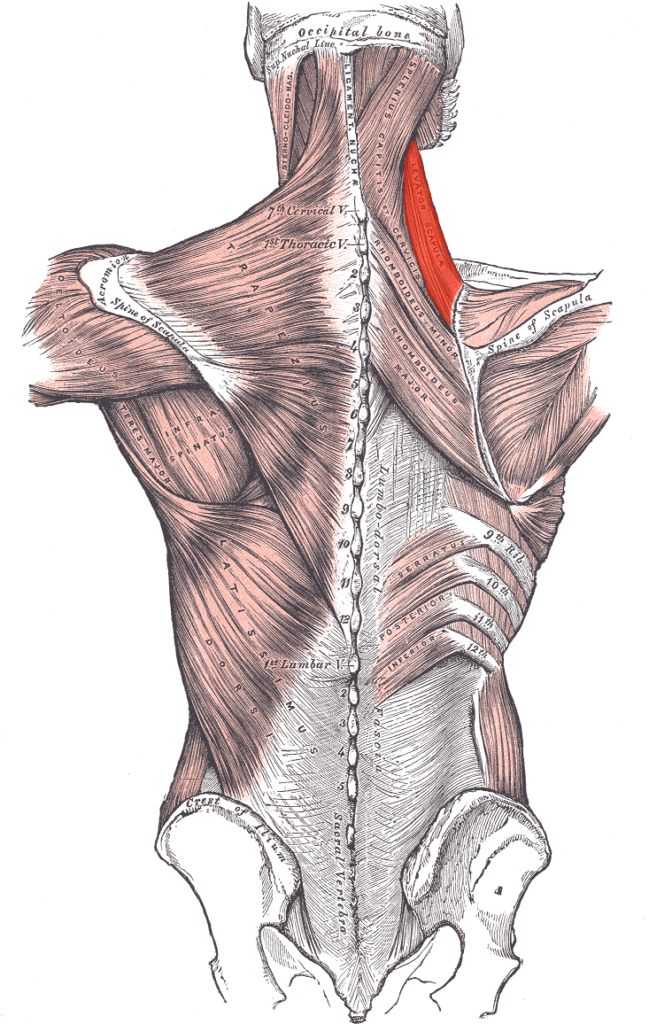
Levator Scapulae
The levator scapulae is a slender, elongated muscle located at the back and side of the neck, playing a crucial role in the movement and stabilization of the scapula (shoulder blade). It originates from the transverse processes of the upper four cervical vertebrae (C1 to C4) and inserts into the superior part of the medial border of the scapula. The primary function of the levator scapulae is to elevate the scapula, allowing for shoulder shrugging and assisting in tilting the scapula downward during certain arm movements. Additionally, it helps in rotating the neck and contributes to maintaining proper head posture. Despite its important functions, the levator scapulae is often overlooked in traditional strength training routines, leading to potential imbalances and neck or shoulder discomfort, especially in individuals with poor posture or those who engage in repetitive overhead activities. Tightness or weakness in this muscle can contribute to neck pain, stiffness, and tension headaches. Strengthening and properly stretching the levator scapulae is essential for maintaining healthy neck and shoulder mechanics, reducing the risk of upper body discomfort, and enhancing overall posture and functional movement.
An effective exercise that specifically targets the levator scapulae is the Dumbbell Shrug with a Slight Head Tilt. Here’s how to perform it:
1. Starting Position: Stand upright with your feet shoulder-width apart, holding a pair of dumbbells at your sides with your palms facing your body. Keep your shoulders relaxed and your arms fully extended.
2. Head Position: Tilt your head slightly to one side (toward one shoulder) to lengthen the levator scapulae on the opposite side. This head position helps isolate the levator scapulae during the exercise.
3. Movement: Slowly shrug your shoulders upward toward your ears, focusing on the side where the levator scapulae is lengthened. As you lift your shoulders, avoid using your arms to help, and focus on using the muscles in your neck and upper back.
4. Contraction: At the top of the movement, when your shoulders are as close to your ears as possible, hold the position for a moment and squeeze the levator scapulae to maximize contraction.
5. Return: Slowly lower your shoulders back to the starting position with control, keeping the tension in the levator scapulae.
6. Repetition: Perform the desired number of repetitions on one side, then switch the head tilt and repeat the exercise for the opposite levator scapulae.
The dumbbell shrug with a slight head tilt is particularly effective for targeting the levator scapulae because it isolates the muscle by minimizing the involvement of other muscles in the shoulder area. This exercise helps improve neck and shoulder strength, reduces tension, and can help alleviate discomfort or tightness in the upper back and neck region.
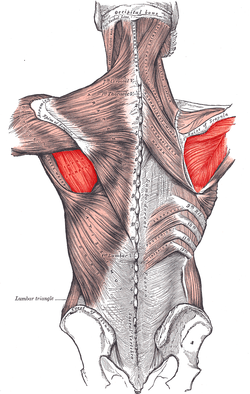
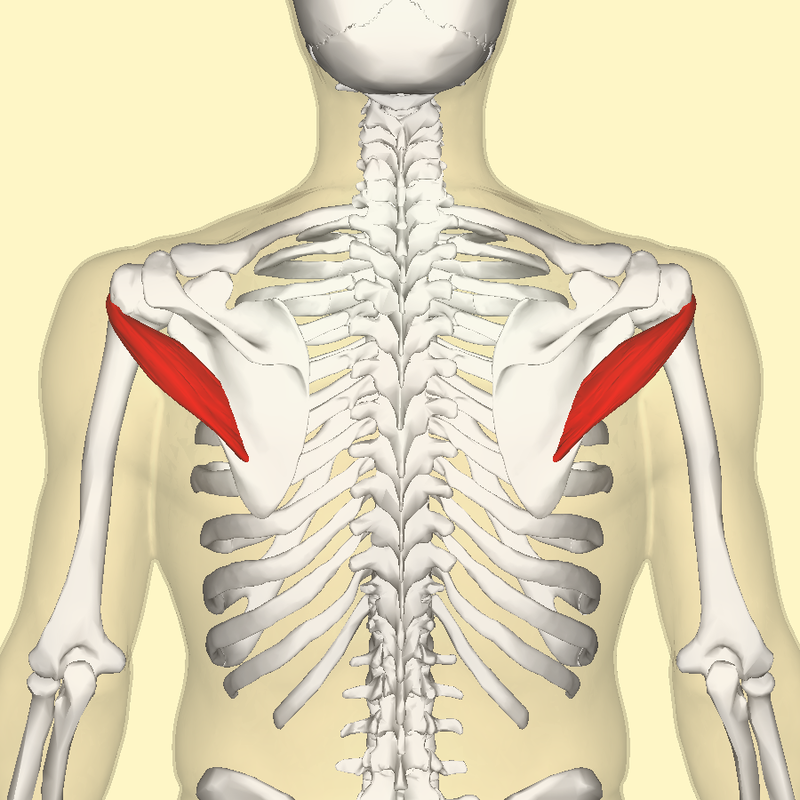
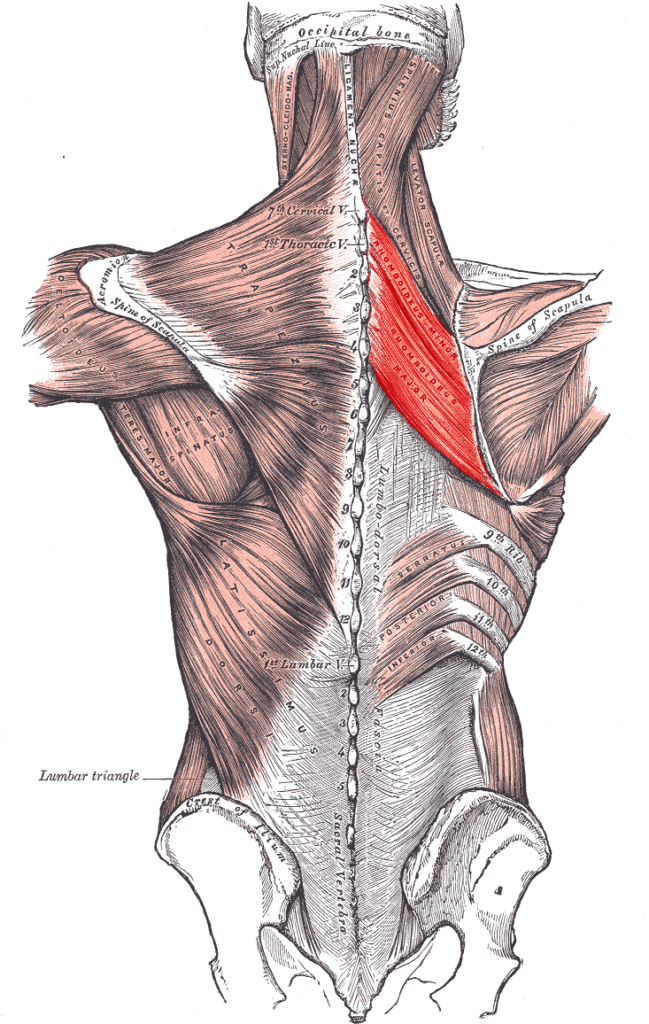
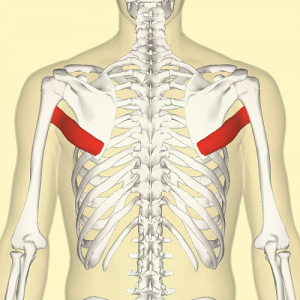
Teres Major
The teres major is a small but powerful muscle located in the upper back, just below the shoulder joint, playing an essential role in the movement and stability of the arm. It originates from the lower part of the lateral border of the scapula and inserts into the medial lip of the intertubercular sulcus of the humerus (upper arm bone). The primary functions of the teres major include internal rotation, adduction, and extension of the arm, which are important for movements such as pulling, lifting, and rotating the arm inward. Often referred to as the “little lat” because of its similar function to the latissimus dorsi, the teres major assists in stabilizing the shoulder joint during these actions. Despite its important role, the teres major is frequently overshadowed by larger muscles like the latissimus dorsi and pectorals in traditional upper body workouts. Neglecting the teres major can lead to imbalances in shoulder strength and mobility, potentially increasing the risk of injury during activities that require strong and coordinated arm movements. Strengthening the teres major is crucial for enhancing shoulder stability, improving the range of motion, and supporting overall upper body strength and function.
An effective exercise that specifically targets the teres major is the Single-Arm Dumbbell Row with an Emphasis on Extension. Here’s how to perform it:
1. Starting Position: Stand next to a bench, placing one knee and the same-side hand on the bench for support. Your back should be flat, and your other foot should be firmly planted on the ground. Hold a dumbbell in your free hand with your arm extended straight down toward the floor.
2. Movement: Begin by pulling the dumbbell upward toward your hip, leading with your elbow while keeping your arm close to your body. Focus on using the teres major to initiate the movement by drawing your upper arm backward in an extended arc.
3. Contraction: As you pull the dumbbell up, bring your elbow slightly past your torso and squeeze the muscles in your upper back, particularly the teres major. Hold this position for a brief moment to maximize muscle contraction.
4. Return: Slowly lower the dumbbell back to the starting position, fully extending your arm while maintaining control over the movement.
5. Repetition: Perform the desired number of repetitions on one side, then switch to the other arm and repeat.
The single-arm dumbbell row with an emphasis on extension is particularly effective for isolating the teres major, as it focuses on shoulder extension and adduction, which are the primary functions of this muscle. Strengthening the teres major helps improve overall shoulder stability, enhances upper back strength, and contributes to a more balanced and well-developed upper body.
Pectoralis Minor
The pectoralis minor is a small, triangular muscle located underneath the larger pectoralis major in the chest, playing a crucial role in the movement and stabilization of the scapula (shoulder blade). It originates from the third, fourth, and fifth ribs near their junction with the costal cartilages and inserts into the coracoid process of the scapula. The primary functions of the pectoralis minor include protracting the scapula, pulling it forward and downward, and stabilizing the scapula against the thoracic wall. This muscle is particularly important during movements such as reaching forward, pushing, and stabilizing the shoulder girdle during upper body exercises. Despite its vital role in shoulder mechanics, the pectoralis minor is often overlooked in traditional chest workouts, which typically focus on the more visible pectoralis major. When the pectoralis minor becomes tight or overactive, it can contribute to poor posture, rounded shoulders, and shoulder impingement. Strengthening and properly stretching the pectoralis minor are essential for maintaining healthy shoulder alignment, improving posture, and preventing upper body discomfort and injuries, especially in those who frequently engage in pushing activities or desk work.
An effective exercise that specifically targets the pectoralis minor is the Incline Push-Up Plus. Here’s how to perform it:
1. Starting Position: Set up an incline by placing your hands on a bench, step, or sturdy platform that is about knee to waist height. Position your hands slightly wider than shoulder-width apart, with your body forming a straight line from your head to your heels. Your arms should be fully extended, and your shoulders relaxed.
2. Movement: Lower your chest toward the bench by bending your elbows, performing a standard push-up. As you push back up to the starting position, add an extra movement by actively pushing your shoulders forward and allowing your upper back to round slightly. This “plus” movement involves protracting the shoulder blades, which specifically engages the pectoralis minor.
3. Contraction: Focus on contracting the pectoralis minor as you push your shoulders forward during the “plus” part of the movement. This action helps to isolate and strengthen the muscle.
4. Return: After completing the protraction, return your shoulders to their neutral position and repeat the entire push-up movement.
5. Repetition: Perform the desired number of repetitions, ensuring that each push-up includes the “plus” movement to fully engage the pectoralis minor.
The incline push-up plus is particularly effective for targeting the pectoralis minor because the added scapular protraction directly activates this muscle, which is responsible for moving the scapula forward and downward. Strengthening the pectoralis minor can help improve shoulder stability, enhance posture, and reduce the risk of shoulder impingement or other upper body injuries.
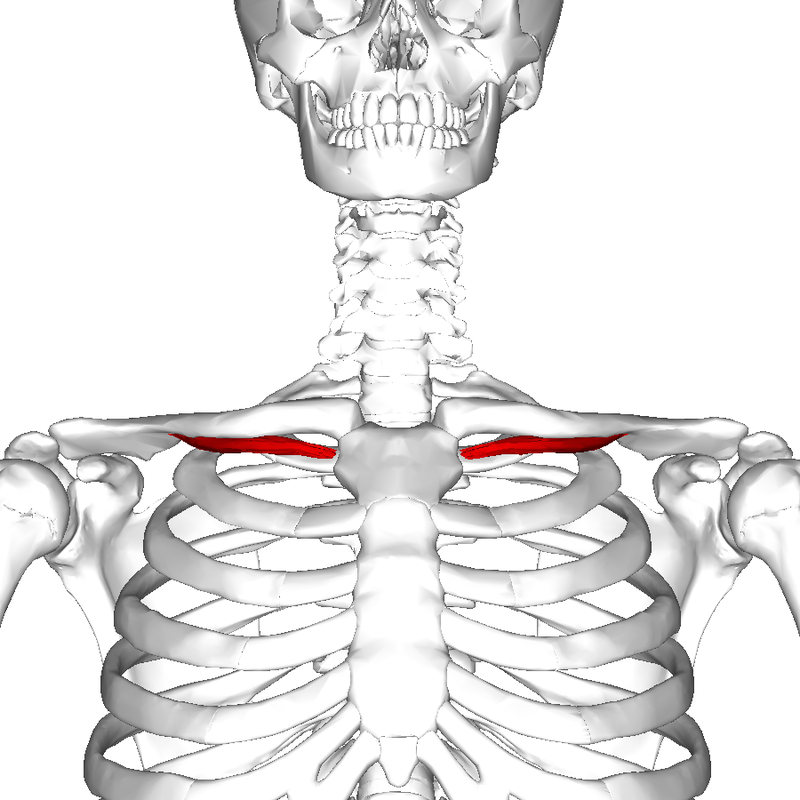
Subclavius
The subclavius is a small, yet significant muscle located beneath the clavicle (collarbone), running horizontally from the first rib to the underside of the clavicle. Despite its modest size, the subclavius plays a crucial role in stabilizing the clavicle, especially during movements of the shoulder and arm. This muscle acts to depress the clavicle, pulling it downward and forward, which helps protect the sternoclavicular joint (where the clavicle meets the sternum) and contributes to the overall stability of the shoulder girdle. The subclavius also helps absorb shock and impact forces that might otherwise be transmitted directly to the clavicle, reducing the risk of fractures. However, the subclavius is often overlooked in both fitness routines and anatomical discussions, as it is a deep muscle that doesn’t contribute directly to visible muscle mass or strength. Tightness or dysfunction in the subclavius can contribute to shoulder pain or reduced range of motion, particularly in activities that involve extensive arm movement or overhead lifting. Properly maintaining the subclavius through targeted stretching and strengthening can enhance shoulder stability, improve posture, and reduce the risk of injury in the upper body.
An effective exercise that specifically targets the subclavius is the Subclavius Stretch with Resistance Band Activation. This exercise focuses on both stretching and activating the subclavius muscle. Here’s how to perform it:
1. Starting Position: Attach a resistance band to a sturdy anchor point at about chest height. Stand facing away from the anchor, holding the band in one hand with your arm extended straight forward at shoulder height. Your palm should face downward.
2. Movement (Stretch and Activation): Begin by taking a small step forward to create slight tension in the band, then gently tilt your head away from the arm holding the band. This stretches the subclavius muscle.
3. Activation: While maintaining the stretch, slightly pull the band downward and across your body at a diagonal angle, as if trying to bring your hand toward the opposite hip. Focus on using the subclavius to initiate this movement, which engages the muscle by stabilizing the clavicle.
4. Contraction: Hold the position briefly at the end of the movement, feeling the tension in the subclavius as it works to stabilize the shoulder.
5. Return: Slowly release the tension by bringing your arm back to the starting position and relaxing your head.
6. Repetition: Perform the desired number of repetitions, then switch to the other arm to work the subclavius on the opposite side.
This exercise targets the subclavius by combining a gentle stretch with activation of the muscle as it stabilizes the clavicle. While the subclavius is a small and often overlooked muscle, strengthening it can help improve shoulder stability and prevent issues related to clavicle movement, especially in activities that involve pushing or overhead movements.
Infrasternal Angle Muscles
The infrasternal angle muscles, primarily including the transversus thoracis, play an essential role in respiratory mechanics and core stability. Located on the inside of the anterior chest wall, the transversus thoracis originates from the posterior surface of the lower part of the sternum and inserts into the inner surfaces of the costal cartilages of the second to sixth ribs. These muscles help depress the ribs during forced expiration, such as when blowing out air forcefully or during vigorous physical activity, aiding in the expulsion of air from the lungs. Although these muscles are not directly involved in the more visible aspects of core strength or muscle mass, they contribute to the overall stability of the thoracic region, influencing posture and the effectiveness of breathing patterns. The infrasternal angle muscles are often overlooked in traditional fitness routines, which typically emphasize more prominent abdominal muscles. However, strengthening and maintaining the flexibility of these muscles are crucial for efficient respiratory function, improved core stability, and maintaining proper ribcage positioning, which can impact overall posture and physical performance. Neglecting these muscles may lead to dysfunctional breathing patterns and imbalances in the core, making them important to consider in a comprehensive fitness program.
Transversus Thoracis
The transversus thoracis is a thin, flat muscle located on the inner surface of the anterior chest wall, playing an important role in respiratory function. It originates from the posterior surface of the lower part of the sternum and the xiphoid process, extending laterally to attach to the inner surfaces of the costal cartilages of the second to sixth ribs. The primary function of the transversus thoracis is to assist in depressing the ribs during forced expiration, such as during heavy breathing, coughing, or blowing out air forcefully. By pulling the rib cage downward, this muscle helps reduce the volume of the thoracic cavity, facilitating the expulsion of air from the lungs. Despite its critical role in the mechanics of breathing, the transversus thoracis is often overlooked in discussions of core and respiratory muscles, as it is not involved in the more visible aspects of muscle strength or body contour. However, maintaining the strength and flexibility of the transversus thoracis is essential for efficient respiratory function, particularly during intense physical activities that demand rapid and forceful breathing. Additionally, its role in stabilizing the ribcage contributes to overall thoracic stability, which is important for proper posture and the function of other core muscles. Neglecting this muscle may lead to less efficient breathing and potential imbalances in the chest wall, making it a valuable component of a comprehensive fitness and respiratory health program.
An effective exercise that specifically targets the transversus thoracis is the Deep Breathing with Resistance (Respiratory Muscle Training). This exercise focuses on engaging the transversus thoracis, a muscle involved in the forced expiration of air from the lungs. Here’s how to perform it:
1. Starting Position: Sit or stand in a comfortable position with your spine straight. Place a resistance band or a hand on your chest to provide light pressure and feedback.
2. Movement (Inhalation): Begin by taking a deep breath in through your nose, allowing your chest and ribs to expand outward as you fill your lungs with air. Focus on keeping your shoulders relaxed and letting the movement come from your chest.
3. Movement (Exhalation): As you exhale through your mouth, engage the transversus thoracis by actively pulling your ribs downward and inward. This action should feel like you are trying to forcefully expel the air from your lungs, which engages the transversus thoracis muscle. You can apply gentle pressure with your hands or resistance band to provide additional resistance during the exhalation.
4. Contraction: Focus on fully contracting the transversus thoracis as you complete the exhalation, ensuring that your ribs move downward and inward.
5. Repetition: Repeat the breathing cycle for the desired number of repetitions, concentrating on the active engagement of the transversus thoracis during each exhalation.
This deep breathing exercise with resistance is particularly effective for targeting the transversus thoracis because it directly involves the muscle in its primary function—assisting with forced exhalation and stabilizing the ribcage. Strengthening the transversus thoracis through respiratory muscle training can improve breathing efficiency, enhance respiratory function, and support the overall stability of the thoracic region. This exercise is especially beneficial for athletes, singers, or individuals looking to improve their respiratory health and core stability.
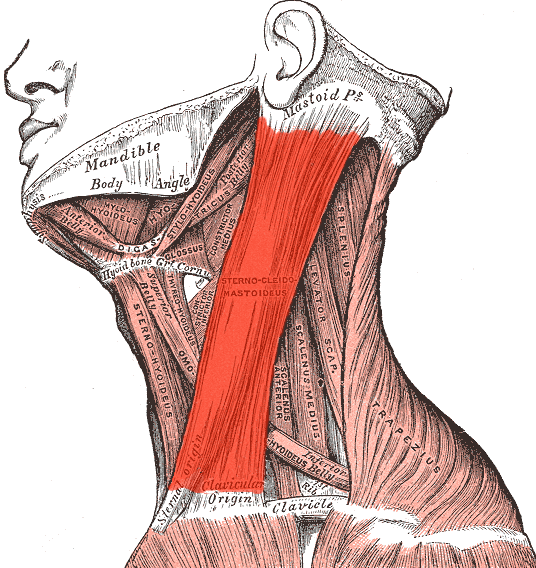
Sternocleidomastoid
The sternocleidomastoid (SCM) is a prominent and powerful muscle in the neck that plays a crucial role in head and neck movement, as well as in maintaining posture. It originates from two points: the manubrium of the sternum and the medial portion of the clavicle, and it inserts into the mastoid process of the temporal bone of the skull, just behind the ear. The primary functions of the sternocleidomastoid are to rotate the head to the opposite side, tilt it toward the same side, and flex the neck forward, such as when nodding or bringing the chin to the chest. Additionally, when both sternocleidomastoid muscles work together, they can elevate the sternum and clavicle, assisting in deep breathing by increasing the volume of the thoracic cavity. Despite its importance in head and neck mobility, the SCM is often overlooked in strength and conditioning routines, leading to potential imbalances, tightness, and discomfort, especially for those who spend long hours in static positions, such as sitting at a desk. Properly stretching and strengthening the sternocleidomastoid is essential for maintaining neck flexibility, preventing tension headaches, and promoting good posture. Neglecting this muscle can contribute to neck pain, reduced range of motion, and imbalances that affect overall upper body alignment.
An effective exercise that specifically targets the sternocleidomastoid (SCM) is the Neck Flexion with Resistance. This exercise helps strengthen the SCM, which is responsible for flexing and rotating the neck. Here’s how to perform it:
1. Starting Position: Lie on your back on a flat surface, such as a bench or mat, with your head hanging slightly off the edge. Keep your knees bent and feet flat on the floor for stability. Place a small, soft weight (such as a rolled-up towel, small medicine ball, or light resistance band) on your forehead for resistance.
2. Movement: Begin by slowly tucking your chin toward your chest, flexing your neck forward. Focus on engaging the sternocleidomastoid muscles on both sides of your neck as you lift your head toward your chest.
3. Contraction: Hold the top position for a moment, fully engaging the SCM, and ensure your movement is controlled and deliberate.
4. Return: Slowly lower your head back to the starting position, allowing your neck to extend gently while maintaining control.
5. Repetition: Perform the desired number of repetitions, ensuring that each movement is slow and controlled to effectively target the sternocleidomastoid.
For added difficulty, you can increase the resistance by using a slightly heavier weight or by performing the exercise with a resistance band. This exercise is particularly effective for strengthening the SCM, improving neck stability, and enhancing posture, especially for those who spend long hours in forward head positions, such as working at a desk or using electronic devices. Properly strengthening the SCM can also help alleviate neck pain and tension.
Core and midsection
The core and midsection are fundamental areas of the body that play a crucial role in almost every movement, providing stability, balance, and strength. The core is not limited to the visible “six-pack” muscles, or rectus abdominis, but also includes deeper muscles like the transverse abdominis, internal and external obliques, multifidus, and muscles of the pelvic floor. These muscles work together to stabilize the spine, support posture, and facilitate movements like twisting, bending, and lifting. The transverse abdominis acts as a natural corset, providing deep core stability, while the obliques are essential for trunk rotation and lateral flexion. The multifidus and pelvic floor muscles contribute to spinal support and stability, particularly during dynamic movements. A strong and well-conditioned core is vital not only for athletic performance but also for everyday activities, as it helps protect the spine, improve balance, and prevent injuries. However, traditional fitness routines often focus only on the superficial abdominal muscles, neglecting the deeper core muscles that are crucial for true functional strength. Comprehensive core training that targets all these muscles is essential for maintaining a healthy, resilient body, capable of handling the demands of both daily life and athletic endeavors.
Transverse Abdominis
The transverse abdominis (TVA) is the deepest layer of the abdominal muscles, playing a vital role in core stability and overall trunk support. Unlike the more superficial rectus abdominis, which is responsible for the visible “six-pack,” the transverse abdominis wraps around the torso horizontally, like a natural corset. It originates from the lower ribs, thoracolumbar fascia, iliac crest, and inguinal ligament, and inserts into the linea alba and pubic crest. The primary function of the transverse abdominis is to compress the abdominal contents, which stabilizes the spine and pelvis during movement. This stabilization is essential for maintaining posture, protecting the lower back, and ensuring efficient movement patterns during both everyday activities and more intense physical exertion. Activating the TVA creates intra-abdominal pressure, which acts as a supportive brace for the lower back, reducing the risk of injury, especially during heavy lifting or dynamic sports. Despite its critical role in core function, the transverse abdominis is often neglected in traditional ab workouts, which tend to focus more on the superficial muscles. Strengthening the TVA through targeted exercises, such as planks and abdominal bracing, is essential for developing a strong, stable core that enhances overall performance and reduces the risk of lower back pain and injury.
An effective exercise that specifically targets the transverse abdominis (TVA) is the Vacuum Exercise (Stomach Vacuum). This exercise focuses on engaging and strengthening the deepest layer of the abdominal muscles. Here’s how to perform it:
1. Starting Position: You can perform this exercise in a standing, sitting, or kneeling position, or even lying down on your back. Start by ensuring your spine is in a neutral position, with your shoulders relaxed and your chest lifted slightly.
2. Movement (Exhalation): Begin by taking a deep breath in through your nose, filling your lungs with air and allowing your abdomen to expand naturally.
3. Contraction (Vacuum): As you exhale slowly through your mouth, draw your belly button inward toward your spine, pulling your abdominal wall in as tightly as possible. Imagine you are trying to make your waist as small as possible. This action engages the transverse abdominis, which acts like a natural corset around your waist.
4. Hold: Hold the vacuum position for 10 to 20 seconds while continuing to breathe lightly. Keep the rest of your body relaxed and focus on maintaining the tension in your core.
5. Return: After holding the contraction, relax your abdominal muscles and return to the starting position.
6. Repetition: Perform several repetitions, gradually increasing the hold time as your TVA strength improves.
The vacuum exercise is particularly effective for targeting the transverse abdominis because it emphasizes the muscle’s role in stabilizing the core and drawing the abdominal wall inward. Regular practice of this exercise can improve core stability, enhance posture, and contribute to a slimmer waistline by strengthening the deep core muscles that support the spine and internal organs. It is a foundational exercise often used in both fitness and rehabilitation programs to improve core function and reduce the risk of lower back pain.
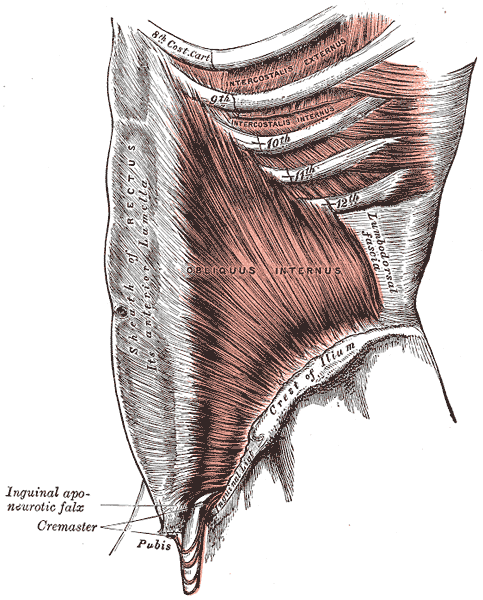
Internal Obliques
The internal obliques are a crucial component of the core musculature, located deep within the abdominal wall beneath the external obliques. These muscles originate from the iliac crest, thoracolumbar fascia, and inguinal ligament, and they insert into the lower ribs and the linea alba, a fibrous structure that runs down the midline of the abdomen. The internal obliques play a key role in trunk rotation, lateral flexion (bending sideways), and in stabilizing the spine and pelvis during movement. They work in concert with the external obliques, but in the opposite direction, creating a powerful mechanism for twisting motions, such as those needed in sports like tennis or golf. Additionally, the internal obliques assist in compressing the abdominal contents, contributing to intra-abdominal pressure that supports the lower back and improves posture. Despite their importance, the internal obliques are often undertrained in conventional core workouts, which tend to focus more on the rectus abdominis and superficial obliques. Targeting the internal obliques through rotational exercises, side planks, and other movements that emphasize twisting and lateral bending is essential for a well-rounded core, enhancing both functional strength and stability, and reducing the risk of injury in the lower back and hips.
An effective exercise that specifically targets the internal obliques is the Side Plank with Hip Dips. Here’s how to perform it:
1. Starting Position: Begin by lying on your side with your legs extended and stacked on top of each other. Place your forearm on the ground directly beneath your shoulder, with your elbow bent at a 90-degree angle. Your body should form a straight line from head to heels.
2. Movement (Side Plank): Engage your core muscles, including the internal obliques, and lift your hips off the ground so that your body forms a straight line from shoulders to ankles. Keep your top hand either on your hip or extended upward toward the ceiling for balance.
3. Hip Dips: From the side plank position, slowly lower your hip toward the floor without touching it, then lift your hip back up to the starting position. Focus on engaging the internal obliques on the side closest to the floor as you perform this dipping motion.
4. Contraction: At the top of each lift, squeeze the internal obliques to maximize muscle engagement. Maintain a steady, controlled movement throughout the exercise.
5. Repetition: Perform the desired number of repetitions on one side, then switch to the other side and repeat.
The side plank with hip dips is particularly effective for targeting the internal obliques because it challenges these muscles to stabilize the body and control lateral movement. This exercise not only strengthens the internal obliques but also improves overall core stability, enhances balance, and supports better posture. By regularly incorporating this exercise into your routine, you can develop stronger, more resilient internal obliques, which play a key role in trunk rotation, lateral flexion, and maintaining a stable core during various activities.
Quadratus Lumborum
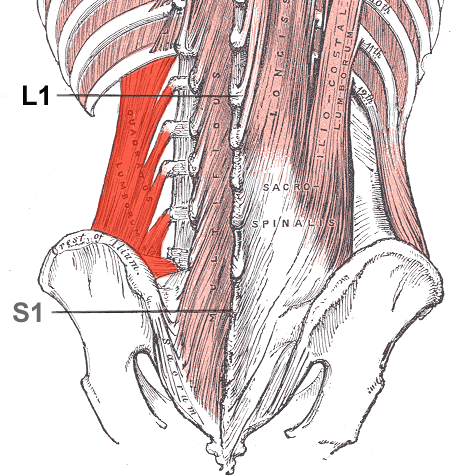
The quadratus lumborum (QL) is a deep muscle in the lower back that plays a vital role in stabilizing the spine and supporting the pelvis. It originates from the iliac crest (the top of the hip bone) and the iliolumbar ligament and inserts into the 12th rib and the transverse processes of the lumbar vertebrae. The quadratus lumborum is primarily responsible for lateral flexion of the spine, allowing you to bend to the side, as well as extending the lumbar spine when both sides contract simultaneously. Additionally, it helps stabilize the pelvis and lower back during activities such as walking, running, and lifting, making it crucial for maintaining proper posture and alignment. The QL also plays a significant role in respiration by anchoring the 12th rib during deep inhalation, aiding in the mechanics of breathing. Despite its importance, the quadratus lumborum is often overlooked in traditional workout routines, which can lead to imbalances and contribute to lower back pain or discomfort, especially in those who sit for prolonged periods or perform repetitive bending motions. Strengthening and stretching the quadratus lumborum through targeted exercises like side planks, hip hikes, and specific stretches can enhance spinal stability, improve core strength, and reduce the risk of lower back injuries, making it an essential muscle for both functional movement and overall back health.
An effective exercise that specifically targets the quadratus lumborum (QL) is the Side Bridge (Side Plank) with Leg Lift. Here’s how to perform it:
1. Starting Position: Begin by lying on your side with your legs extended and stacked on top of each other. Place your forearm on the ground directly beneath your shoulder, with your elbow bent at a 90-degree angle. Your body should form a straight line from head to heels.
2. Movement (Side Plank): Engage your core and lift your hips off the ground so that your body forms a straight line from shoulders to ankles. Your opposite arm can be extended toward the ceiling or placed on your hip for balance.
3. Leg Lift: Once you are stable in the side plank position, lift your top leg upward, maintaining the alignment of your body. This movement increases the demand on the quadratus lumborum as it works to stabilize your body and keep your hips from dropping.
4. Contraction: As you lift your leg, focus on engaging the quadratus lumborum on the side closest to the floor. Hold the leg lift for a moment at the top, then slowly lower your leg back to the starting position while maintaining the side plank.
5. Repetition: Perform the desired number of leg lifts on one side, then switch to the other side and repeat the exercise.
The side bridge with leg lift is particularly effective for targeting the quadratus lumborum because it challenges this muscle to stabilize the pelvis and spine laterally while also resisting the downward pull of gravity. Strengthening the QL with this exercise helps improve lateral stability, reduce lower back pain, and enhance core strength, especially during activities that involve side bending or lifting. Regularly incorporating this exercise into your routine can lead to a stronger, more resilient lower back and better overall functional movement.
Multifidus
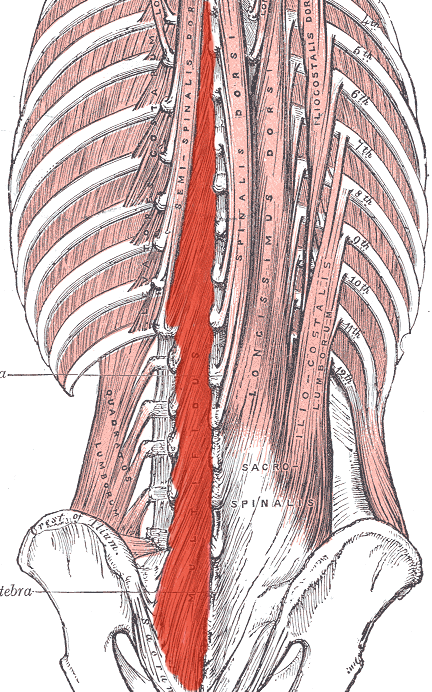
The multifidus is a deep spinal muscle that plays a critical role in stabilizing the vertebrae and maintaining proper posture. Located along the spine, the multifidus runs from the sacrum (at the base of the spine) to the cervical vertebrae (neck), attaching to the spinous processes of each vertebra. Unlike larger, more superficial back muscles, the multifidus consists of many small, segmented muscles that provide fine-tuned control of spinal movement and stability. Its primary function is to stabilize the spine during movement by preventing excessive motion between individual vertebrae, which is crucial for protecting the spinal column from injury. The multifidus works continuously, even during simple activities like sitting or standing, to maintain an upright posture and support the alignment of the spine. Despite its importance, the multifidus is often underdeveloped in people with back pain, as it can weaken due to inactivity or improper movement patterns. Strengthening the multifidus through targeted exercises, such as bird-dogs, quadruped extensions, and exercises that challenge core stability, is essential for improving spinal health, reducing the risk of back pain, and enhancing overall functional movement. By maintaining a strong and active multifidus, individuals can achieve better posture, more effective movement patterns, and a reduced likelihood of lower back injuries.
An effective exercise that specifically targets the multifidus is the Bird-Dog exercise. Here’s how to perform it:
1. Starting Position: Begin on your hands and knees in a tabletop position, with your hands directly under your shoulders and your knees under your hips. Keep your spine neutral and engage your core muscles to maintain stability.
2. Movement: Simultaneously extend your right arm forward and your left leg backward, ensuring that both limbs remain parallel to the ground. Focus on keeping your hips level and your spine stable throughout the movement, avoiding any excessive arching or twisting.
3. Contraction: As you extend your arm and leg, concentrate on engaging the multifidus muscles along your spine to stabilize your torso. Hold the extended position for a moment, feeling the contraction in the multifidus.
4. Return: Slowly bring your arm and leg back to the starting position, maintaining control and stability in your core.
5. Repetition: Perform the exercise on the opposite side, extending your left arm and right leg. Alternate sides for the desired number of repetitions.
The bird-dog exercise is particularly effective for targeting the multifidus because it requires spinal stability and controlled movement, which directly engages these deep back muscles. The multifidus muscles play a critical role in maintaining spinal alignment and controlling small, stabilizing movements of the vertebrae. Regularly incorporating the bird-dog into your exercise routine can help improve spinal stability, reduce the risk of lower back pain, and enhance overall core strength and balance.
Pelvic Floor Muscles
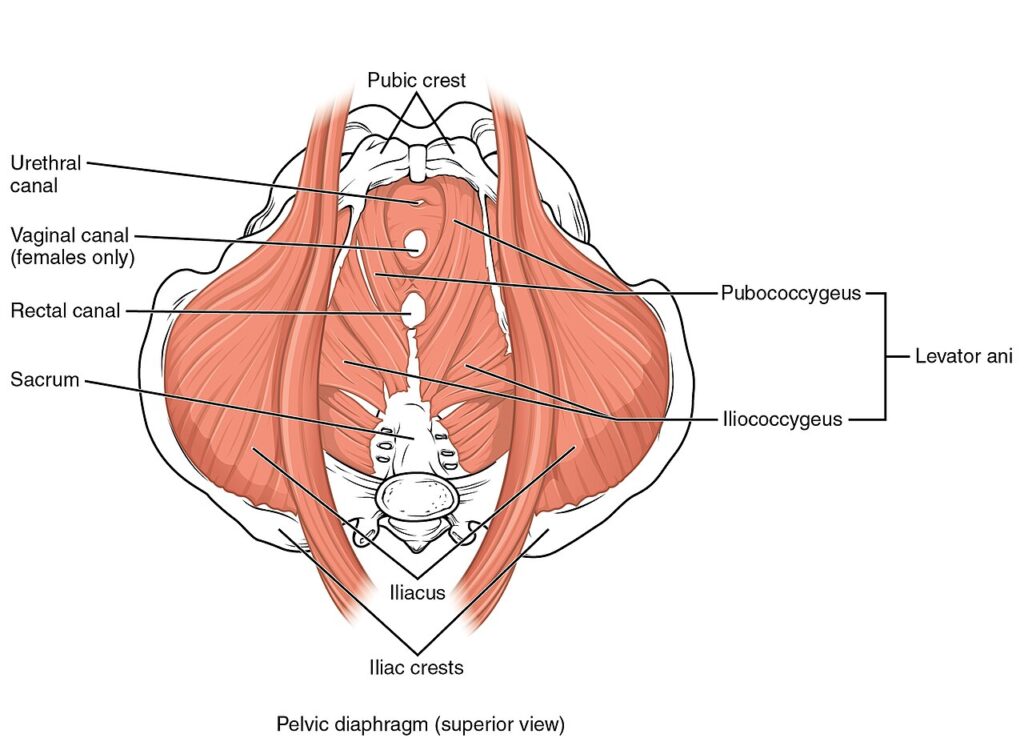
The pelvic floor muscles are a group of muscles located at the base of the pelvis, forming a hammock-like structure that supports the pelvic organs, including the bladder, intestines, and, in women, the uterus. These muscles play a crucial role in core stability, urinary and bowel control, sexual function, and maintaining proper posture. The pelvic floor muscles work in coordination with the deep abdominal muscles, diaphragm, and lower back muscles to stabilize the pelvis and spine during movement and activities such as lifting, running, and jumping. Despite their importance, pelvic floor muscles are often overlooked in fitness routines, which can lead to weakness, particularly in individuals who have undergone pregnancy, surgery, or those who lead a sedentary lifestyle. Weak pelvic floor muscles can contribute to issues such as urinary incontinence, pelvic organ prolapse, and lower back pain. Strengthening the pelvic floor through targeted exercises, such as Kegels, pelvic tilts, and exercises that engage the deep core, is essential for maintaining pelvic health, improving core strength, and enhancing overall functional fitness. By incorporating pelvic floor training into regular exercise routines, individuals can prevent or alleviate pelvic floor dysfunction, support better posture, and improve overall well-being.
An effective exercise that specifically targets the pelvic floor muscles is the Kegel Exercise. Here’s how to perform it:
1. Starting Position: You can perform Kegel exercises in various positions, such as lying down, sitting, or standing. Choose a comfortable position where you can relax your body, particularly your abdominal and thigh muscles.
2. Identification: Before starting, identify your pelvic floor muscles by attempting to stop the flow of urine midstream when you’re using the bathroom. The muscles you use to do this are your pelvic floor muscles. Do not perform the Kegel exercise during urination regularly, as this can lead to incomplete bladder emptying and urinary issues.
3. Movement (Contraction): Once you’ve identified your pelvic floor muscles, contract them by imagining that you are trying to lift or squeeze the muscles upward, as if you were stopping the flow of urine or holding in gas. Make sure to only engage the pelvic floor muscles, keeping your abdominal, gluteal, and thigh muscles relaxed.
4. Hold: Hold the contraction for about 3 to 5 seconds, focusing on maintaining the tension in your pelvic floor muscles without involving other muscle groups.
5. Release: Slowly relax the pelvic floor muscles, completely releasing the contraction for about 3 to 5 seconds before repeating.
6. Repetition: Perform 10 to 15 repetitions in one session, aiming to do Kegel exercises multiple times a day. As your strength improves, you can gradually increase the duration of the hold to 10 seconds.
The Kegel exercise is particularly effective for strengthening the pelvic floor muscles, which support the bladder, uterus, and bowel, and play a crucial role in urinary and bowel control, sexual function, and overall core stability. Strengthening these muscles through regular Kegel exercises can help prevent or alleviate issues such as urinary incontinence, pelvic organ prolapse, and improve sexual health. For both men and women, consistently practicing Kegel exercises is key to maintaining pelvic floor health and enhancing overall well-being.
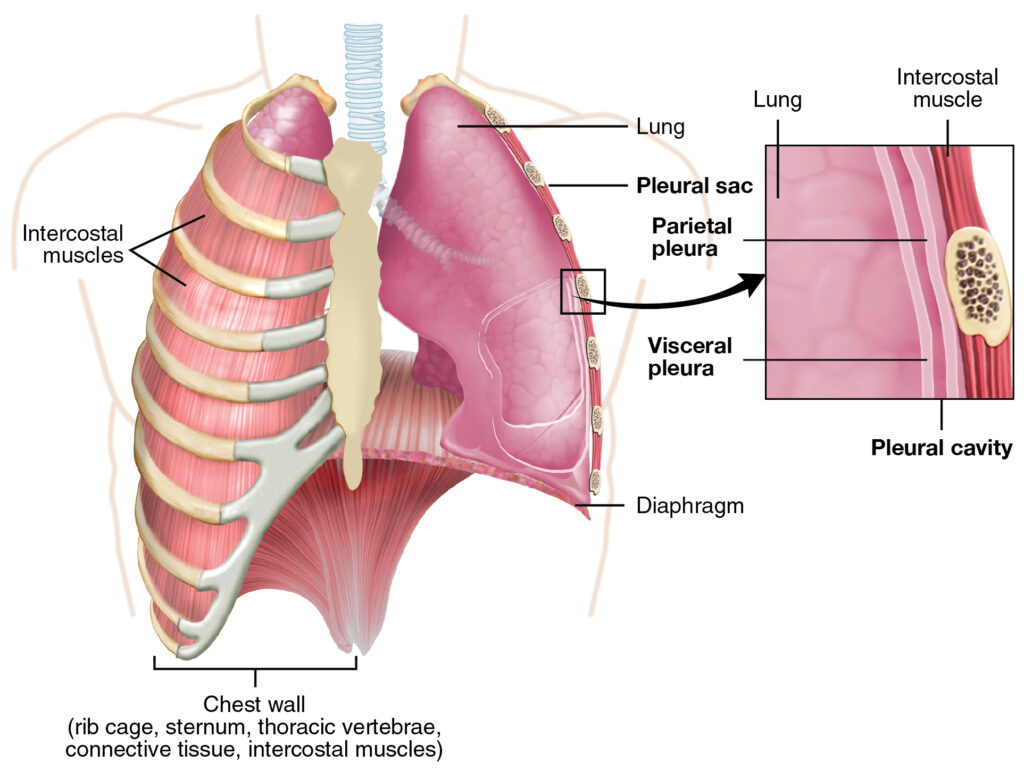
Diaphragm
The diaphragm is a dome-shaped muscle located just below the lungs and heart, playing a vital role in the respiratory process. It separates the thoracic cavity, which houses the lungs and heart, from the abdominal cavity. As the primary muscle of respiration, the diaphragm contracts and flattens when you inhale, creating a vacuum that allows air to be drawn into the lungs. During exhalation, the diaphragm relaxes and returns to its dome shape, pushing air out of the lungs. Beyond its critical role in breathing, the diaphragm also contributes to core stability by working in tandem with the abdominal muscles, pelvic floor, and lower back muscles to maintain intra-abdominal pressure, which supports the spine and internal organs during physical activity. Despite its importance, the diaphragm is often overlooked in discussions of core and respiratory health, with many people relying on shallow chest breathing rather than deep diaphragmatic breathing. Proper diaphragm function is essential for efficient oxygen intake, stress reduction, and maintaining a strong, stable core. Strengthening and training the diaphragm through practices such as deep breathing exercises, yoga, and diaphragmatic breathing techniques can enhance respiratory efficiency, improve posture, reduce tension in the upper body, and support overall physical and mental well-being.
An effective exercise that specifically targets the diaphragm is Diaphragmatic Breathing (Deep Belly Breathing). Here’s how to perform it:
1. Starting Position: You can perform diaphragmatic breathing while lying on your back with your knees bent and feet flat on the floor, sitting in a chair with your back straight, or even standing. Place one hand on your chest and the other on your abdomen, just below your ribcage.
2. Movement (Inhalation): Slowly inhale deeply through your nose, allowing your abdomen to rise as your diaphragm contracts and moves downward. Focus on filling your lungs fully by expanding your belly outward, rather than lifting your chest. Your hand on your abdomen should rise while the hand on your chest remains relatively still.
3. Contraction: Hold the inhaled breath for a second or two, allowing your diaphragm to fully engage and your lungs to fill completely.
4. Exhalation: Exhale slowly and fully through your mouth, gently contracting your abdominal muscles to push the air out. As you exhale, your diaphragm will relax and move upward, helping to expel air from your lungs. Your abdomen should fall back down during this process.
5. Repetition: Continue this controlled breathing pattern for several minutes, focusing on slow, deep breaths that fully engage the diaphragm with each inhalation and exhalation.
Diaphragmatic breathing is particularly effective for strengthening the diaphragm because it encourages full lung expansion and optimal air exchange, which helps to train and tone the diaphragm muscle. This exercise is beneficial for improving respiratory efficiency, reducing stress, enhancing core stability, and promoting relaxation. Diaphragmatic breathing is often used in respiratory therapy, stress management, and athletic training to improve breathing mechanics and overall lung function. Regular practice of this technique can lead to better control over your breathing, enhanced oxygen delivery to your body, and greater overall well-being.
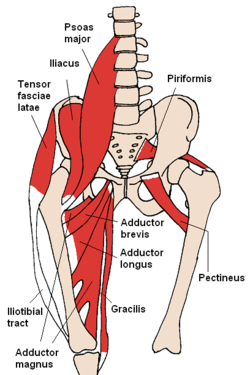
Psoas Major
The psoas major is a deep-seated core muscle that plays a critical role in connecting the upper and lower body, influencing both movement and posture. Originating from the lumbar vertebrae (T12 to L5), it runs down through the pelvis and inserts into the lesser trochanter of the femur (thigh bone). As the primary hip flexor, the psoas major is responsible for lifting the thigh toward the torso, a movement essential for activities such as walking, running, and climbing stairs. Additionally, the psoas major contributes to stabilizing the spine and pelvis, particularly during dynamic movements or when maintaining an upright posture. Because of its deep location and complex role, the psoas major is often overlooked or misunderstood in traditional fitness routines, leading to imbalances that can cause lower back pain, hip tightness, and postural issues. Prolonged sitting, for example, can lead to a shortened and tight psoas major, exacerbating these problems. Strengthening and stretching the psoas major through targeted exercises, such as leg lifts, lunges, and hip flexor stretches, is crucial for maintaining hip flexibility, improving core stability, and preventing lower back and pelvic discomfort. A well-conditioned psoas major enhances overall mobility, supports better posture, and contributes to a balanced, pain-free movement.

An effective exercise that specifically targets the **psoas major** is the **Standing Hip Flexor March**. Here’s how to perform it:
1. Starting Position: Stand upright with your feet hip-width apart. Engage your core to maintain a neutral spine, and keep your shoulders relaxed. If balance is a concern, you can perform this exercise near a wall or chair for support.
2. Movement (Hip Flexion): Begin by lifting your right knee toward your chest, aiming to bring your thigh parallel to the ground. As you lift, focus on engaging the psoas major, which is responsible for hip flexion. Your left leg should remain straight and stable.
3. Contraction: Hold the lifted position for 2-3 seconds, keeping your core tight and your pelvis neutral. You should feel the psoas major working to maintain the position.
4. Return: Slowly lower your right leg back to the starting position, maintaining control over the movement.
5. Repetition: Repeat the movement with your left leg, alternating sides. Perform the desired number of repetitions on each leg, ensuring that each lift is slow and controlled.
The standing hip flexor march is particularly effective for isolating the psoas major because it emphasizes the hip flexion movement, which is the primary function of this muscle. Strengthening the psoas major can improve hip stability, enhance overall core strength, and support better posture and lower back health. This exercise is beneficial for athletes and anyone looking to improve hip mobility and strength, as a strong psoas major contributes to more efficient and powerful lower body movements.
Iliacus
The iliacus is a vital muscle in the hip region, closely associated with the psoas major, together forming the iliopsoas, which is the primary hip flexor. The iliacus originates from the inner surface of the iliac bone (the large pelvic bone) and the sacrum, and it inserts into the lesser trochanter of the femur, merging with the tendon of the psoas major. Its primary function is to flex the thigh at the hip joint, bringing the leg toward the torso, an action fundamental to walking, running, and other lower body movements. Additionally, the iliacus plays a significant role in stabilizing the pelvis during movement and maintaining proper posture. Despite its importance, the iliacus is often overlooked in exercise routines, leading to tightness or weakness, especially in individuals who spend a lot of time sitting. This can result in hip stiffness, lower back pain, and compromised mobility. Targeting the iliacus through stretching and strengthening exercises, such as lunges, leg raises, and hip flexor stretches, is essential for ensuring hip flexibility, improving lower body strength, and supporting overall pelvic stability. A well-conditioned iliacus contributes to more fluid and pain-free movement, enhancing both athletic performance and everyday activities.
An effective exercise that specifically targets the **iliacus** muscle is the **Seated Leg Lift**. Here’s how to perform it:
1. **Starting Position**: Sit on the edge of a chair or bench with your feet flat on the floor and your back straight. Place your hands on the sides of the chair for support, keeping your core engaged to maintain a neutral spine.
2. **Movement (Leg Lift)**: Slowly lift your right knee toward your chest, keeping your back straight and avoiding any leaning backward. Focus on using the iliacus muscle to lift your thigh. Your hip should flex while your lower leg remains relaxed and your foot lifts off the ground.
3. **Contraction**: Hold the lifted position for 2-3 seconds, fully engaging the iliacus as you maintain the position. Your core should stay engaged to support your spine.
4. **Return**: Slowly lower your leg back to the starting position with control, ensuring that your movement is steady and focused.
5. **Repetition**: Repeat the movement with your left leg, alternating sides. Perform the desired number of repetitions on each leg.
The seated leg lift is particularly effective for isolating the iliacus because it focuses on the hip flexion movement, where the iliacus is most active. Strengthening the iliacus helps improve hip stability, enhances core strength, and contributes to better posture and lower back support. This exercise is especially beneficial for those who spend long periods sitting or who want to improve their hip flexibility and strength. Regularly incorporating seated leg lifts into your routine can help maintain a healthy and functional iliacus, supporting overall lower body movement and stability.
Obliquus Capitis
The obliquus capitis muscles, comprising the obliquus capitis superior and obliquus capitis inferior, are small but crucial muscles located at the base of the skull, forming part of the suboccipital group. These muscles play an essential role in head movement and neck stability. The obliquus capitis superior originates from the transverse process of the atlas (the first cervical vertebra) and inserts into the occipital bone of the skull. It primarily assists in tilting the head to the side and extending it backward. The obliquus capitis inferior, originating from the spinous process of the axis (the second cervical vertebra) and inserting into the transverse process of the atlas, is responsible for rotating the head to the same side. Despite their small size, these muscles are critical for fine motor control of the head and neck, allowing for precise movements and contributing to overall postural alignment. However, they are often neglected in both strength training and stretching routines, which can lead to stiffness, tension headaches, and neck pain, particularly in those who spend long hours in front of computers or looking down at devices. Regularly stretching and strengthening the obliquus capitis muscles can help maintain neck flexibility, reduce tension, and support healthy head and neck posture, which is essential for preventing discomfort and enhancing overall well-being.
Inferior
The obliquus capitis inferior is a small but important muscle located at the base of the skull, playing a key role in head and neck movement. Unlike its counterpart, the obliquus capitis superior, this muscle does not attach directly to the skull. Instead, it originates from the spinous process of the axis (C2), the second cervical vertebra, and inserts into the transverse process of the atlas (C1), the first cervical vertebra. The primary function of the obliquus capitis inferior is to rotate the head to the same side, allowing for precise and controlled head movements. It is also involved in stabilizing the atlantoaxial joint, which is crucial for the rotation of the head. Despite its small size, the obliquus capitis inferior plays a significant role in maintaining neck stability and ensuring smooth, pain-free head movements. This muscle is often overlooked in typical exercise routines, which can lead to stiffness and imbalances in the neck, contributing to tension headaches and discomfort, especially in individuals who spend extended periods in static positions, such as sitting at a desk. Targeted exercises and stretches for the obliquus capitis inferior can help maintain neck mobility, reduce tension, and support overall cervical spine health, preventing pain and enhancing daily functional movements.
An effective exercise that specifically targets the **obliquus capitis inferior** muscle is the **Resisted Head Rotation** exercise. Here’s how to perform it:
1. **Starting Position**: Sit or stand in a comfortable position with your spine straight and your shoulders relaxed. Keep your head in a neutral position, facing forward. You will need a resistance band or a towel for this exercise.
2. **Setup**: Wrap a resistance band around your head or place a towel on the side of your head, holding the ends with one hand. The band or towel should be positioned around the back of your head, just above the base of the skull, where the obliquus capitis inferior is located.
3. **Movement (Head Rotation)**: Gently rotate your head to the side against the resistance of the band or towel, focusing on the motion coming from the base of your skull. The obliquus capitis inferior is primarily responsible for rotating the head to the same side, so the exercise targets this muscle as you turn your head.
4. **Contraction**: As you rotate your head, hold the end position for a moment, feeling the contraction in the obliquus capitis inferior.
5. **Return**: Slowly return your head to the starting position, maintaining control over the movement.
6. **Repetition**: Perform the desired number of repetitions on one side, then switch the band or towel to the other side and repeat the exercise for the opposite obliquus capitis inferior.
The resisted head rotation is particularly effective for isolating the obliquus capitis inferior because it directly engages this muscle in its primary function of head rotation. Strengthening the obliquus capitis inferior helps improve neck stability, enhance control over head movements, and reduce the risk of neck stiffness or discomfort. This exercise is beneficial for those looking to improve neck mobility and strength, particularly in activities that require precise head and neck movements.
Superior
The obliquus capitis superior is a small yet essential muscle located at the base of the skull, playing a critical role in the movement and stabilization of the head and neck. This muscle originates from the transverse process of the atlas (C1), the first cervical vertebra, and inserts into the occipital bone, which is the lower part of the skull. The obliquus capitis superior is primarily responsible for tilting the head to the same side and assisting in extending the head backward. It also contributes to the fine control and stabilization of the atlanto-occipital joint, which is vital for precise head movements and maintaining an upright posture. Despite its importance in neck function, the obliquus capitis superior is often overlooked in traditional exercise routines, leading to potential stiffness and imbalances that can contribute to tension headaches, neck pain, and restricted head movement. Regularly stretching and strengthening the obliquus capitis superior can help maintain neck flexibility, alleviate tension, and support healthy alignment of the head and cervical spine, which is crucial for preventing discomfort and enhancing overall neck and upper body function.
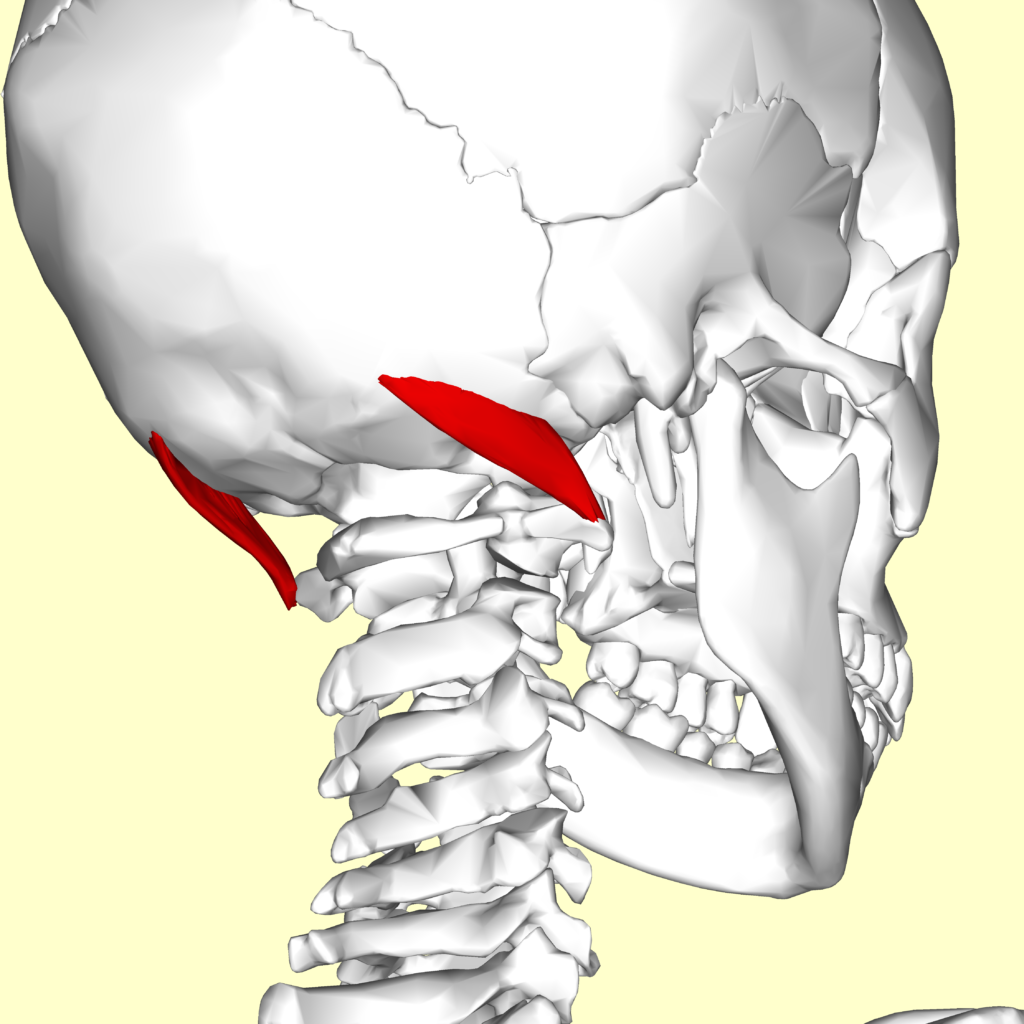
An effective exercise that specifically targets the **obliquus capitis superior** muscle is the **Side-Lying Head Lifts**. Here’s how to perform it:
1. **Starting Position**: Lie down on your side on a flat surface, such as a mat or bench, with your body in a straight line. Rest your head on your bottom arm, which should be extended along the floor. Your top arm can rest on your hip or along your body for stability.
2. **Movement (Head Lift)**: Begin by gently lifting your head away from the bottom arm, focusing on tilting your ear toward your shoulder. The movement should be small and controlled, as the obliquus capitis superior is responsible for slight lateral flexion and extension of the head.
3. **Contraction**: As you lift your head, concentrate on engaging the obliquus capitis superior, which helps tilt and slightly rotate the head. Hold the top position for a brief moment, feeling the muscle contract.
4. **Return**: Slowly lower your head back to the starting position with control, making sure not to let it drop too quickly.
5. **Repetition**: Perform the desired number of repetitions on one side, then switch to lie on the other side and repeat the exercise to target the obliquus capitis superior on the opposite side.
The side-lying head lift is particularly effective for isolating the obliquus capitis superior because it directly involves the muscle’s function in lateral flexion and subtle extension of the head. Strengthening the obliquus capitis superior can improve neck stability, enhance precision in head movements, and help alleviate neck stiffness or discomfort. This exercise is especially useful for individuals who need to maintain or improve neck strength and flexibility, such as those who work in professions that require prolonged head positioning or athletes who need robust neck stability.
Lower body
The lower body is a complex and powerful network of muscles, bones, and joints that play a crucial role in movement, stability, and overall functional strength. It includes major muscle groups such as the quadriceps, hamstrings, gluteal muscles, adductors, and calf muscles, each contributing to various actions like walking, running, jumping, and lifting. The quadriceps, located at the front of the thigh, are essential for extending the knee and powering movements like squats and lunges. The hamstrings, on the back of the thigh, are critical for knee flexion and hip extension, playing a significant role in activities like sprinting and deadlifting. The gluteal muscles, including the gluteus maximus, medius, and minimus, are vital for hip stability, extension, and rotation, supporting movements ranging from simple walking to complex athletic maneuvers. The adductors, located on the inner thigh, help stabilize the legs and bring them toward the body’s midline, while the calf muscles, including the gastrocnemius and soleus, are key for ankle flexion and propulsion during walking and running. Despite the prominence of these large muscle groups, it’s important to also consider the smaller, often overlooked muscles that contribute to balance and injury prevention, such as the tibialis anterior, peroneals, and deep hip stabilizers. Properly training the lower body, with attention to both the major and minor muscle groups, is essential for enhancing strength, improving mobility, and preventing injuries, making it a foundational aspect of overall fitness and athletic performance.
Adductors
The adductors are a group of muscles located on the inner thigh that play a crucial role in stabilizing the legs and controlling movement of the hips and thighs. This group includes the adductor longus, adductor brevis, adductor magnus, gracilis, and pectineus muscles. These muscles originate from the pubic bone and the ischium and insert along the femur (thigh bone). The primary function of the adductors is to bring the legs toward the midline of the body, a movement known as adduction. This action is essential for maintaining balance and stability during activities such as walking, running, and side-to-side movements in sports. Additionally, the adductors assist in hip flexion and rotation, making them important for overall hip joint health and function. Despite their importance, the adductors are often undertrained in traditional workout routines that focus more on the quadriceps and hamstrings, leading to potential imbalances and an increased risk of groin injuries. Strengthening the adductors through exercises like side lunges, adductor machine work, and hip adduction movements is essential for improving leg stability, enhancing athletic performance, and preventing injuries. A well-conditioned adductor group contributes to a more balanced and resilient lower body, supporting both everyday movements and more demanding physical activities.
Adductor Longus
The adductor longus is a prominent muscle in the inner thigh, playing a vital role in the movement and stabilization of the hip and leg. It is one of the main muscles in the adductor group, which is responsible for drawing the thigh inward toward the body’s midline, a movement known as adduction. The adductor longus originates from the pubic bone near the pubic symphysis and extends down to insert into the middle third of the femur’s linea aspera. This muscle is not only crucial for adduction but also assists in hip flexion and medial rotation of the thigh, making it essential for activities that involve crossing the legs, maintaining balance, or stabilizing the pelvis during movement. The adductor longus is particularly engaged in movements that require side-to-side motion, such as in sports like soccer, tennis, or hockey. Despite its importance, it is often overlooked in typical leg workouts, which tend to focus more on the quadriceps and hamstrings. Neglecting the adductor longus can lead to imbalances that increase the risk of groin strains and reduce overall hip stability. Strengthening the adductor longus through targeted exercises like side lunges, hip adduction movements, and stretching can enhance leg stability, prevent injuries, and contribute to a more balanced and functional lower body.
An effective exercise that specifically targets the **adductor longus** is the **Standing Adductor (Side) Leg Raise**. Here’s how to perform it:
1. **Starting Position**: Stand upright next to a wall or a sturdy surface, such as the back of a chair, for support. Your feet should be hip-width apart, and your posture should be tall with your core engaged.
2. **Movement (Leg Raise)**: Shift your weight onto your left leg, keeping it slightly bent, and slowly raise your right leg out to the side, away from your body. However, instead of focusing on lifting the leg high, direct your effort toward moving it inward and slightly across the front of your body to engage the adductor longus.
3. **Contraction**: As you lift your leg inward, concentrate on squeezing the inner thigh muscles, particularly the adductor longus, which is responsible for bringing the leg toward the midline of the body. Hold this position for a moment to fully engage the muscle.
4. **Return**: Slowly lower your leg back to the starting position with control, ensuring that you maintain balance and proper posture throughout the movement.
5. **Repetition**: Perform the desired number of repetitions on one side, then switch to the other leg and repeat the exercise to target the adductor longus on the opposite side.
The standing adductor leg raise is particularly effective for isolating the adductor longus because it emphasizes the muscle’s role in adducting (drawing inward) the thigh. Strengthening the adductor longus helps improve hip stability, enhance inner thigh strength, and prevent groin injuries. This exercise is especially beneficial for athletes involved in sports requiring lateral movements, such as soccer or hockey, and for anyone looking to build balanced leg strength.
Adductor Brevis
The adductor brevis is a small but important muscle located in the inner thigh, playing a key role in hip movement and stability. It is part of the adductor group, which is responsible for bringing the thigh toward the midline of the body, a movement known as adduction. The adductor brevis originates from the inferior ramus of the pubis, near the pubic bone, and inserts into the upper portion of the linea aspera on the femur. In addition to its primary function of thigh adduction, the adductor brevis assists in hip flexion and medial rotation of the thigh, making it crucial for movements that require crossing the legs, maintaining balance, or stabilizing the pelvis during dynamic activities. This muscle is particularly active during side-to-side movements, such as those involved in sports like soccer, basketball, and tennis. Despite its important role, the adductor brevis is often underemphasized in traditional lower body workouts, which can lead to imbalances and an increased risk of groin injuries. Strengthening the adductor brevis through targeted exercises, such as side lunges, hip adduction movements, and stretching routines, is essential for enhancing hip stability, improving athletic performance, and preventing injuries. A strong adductor brevis contributes to a more balanced and resilient lower body, supporting both everyday movements and more intense physical activities.
An effective exercise that specifically targets the **adductor brevis** is the **Seated Hip Adduction with a Resistance Band**. Here’s how to perform it:
1. **Starting Position**: Sit on a sturdy chair or bench with your feet flat on the floor, knees bent at a 90-degree angle. Place a resistance band around both legs, just above your knees. The band should be tight enough to provide resistance but not so tight that it forces your knees together.
2. **Movement (Adduction)**: Begin by slowly pressing your knees inward against the resistance of the band, focusing on squeezing your inner thighs together. The adductor brevis is particularly engaged during this inward movement, as it is responsible for adducting the thigh.
3. **Contraction**: Hold the inward position for a brief moment, maximizing the contraction in the adductor brevis and other inner thigh muscles.
4. **Return**: Slowly allow your knees to move back to the starting position, resisting the band’s pull as you return to the original position.
5. **Repetition**: Perform the desired number of repetitions, ensuring each movement is controlled and focused on the adductor brevis.
The seated hip adduction with a resistance band is particularly effective for targeting the adductor brevis because it provides direct resistance to the adduction movement, the primary function of this muscle. Strengthening the adductor brevis can improve hip stability, enhance inner thigh strength, and reduce the risk of groin strains, especially in activities that require quick changes of direction or lateral movements. This exercise is beneficial for athletes and anyone looking to develop a well-balanced and strong lower body.
Adductor Magnus
The adductor magnus is the largest and most powerful muscle in the adductor group, located in the inner thigh, playing a critical role in hip movement and stabilization. This muscle has a broad origin, extending from the inferior ramus of the pubis and the ischial tuberosity (part of the pelvis), and it inserts along the entire length of the linea aspera and the adductor tubercle of the femur. The adductor magnus is unique in that it performs multiple functions: it is primarily responsible for adduction of the thigh, bringing the leg toward the body’s midline, but it also assists in hip extension, flexion, and medial rotation depending on the specific fibers engaged. This versatility makes the adductor magnus essential for a wide range of movements, including stabilizing the pelvis during walking, running, and side-to-side motions common in many sports. Despite its importance, the adductor magnus is often overlooked in traditional leg workouts, which can lead to muscle imbalances and an increased risk of groin strains or hip instability. Strengthening the adductor magnus through exercises like sumo squats, hip adduction movements, and deep lunges is crucial for developing a strong, balanced lower body. A well-conditioned adductor magnus not only enhances athletic performance but also supports overall hip health and reduces the likelihood of injuries.
An effective exercise that specifically targets the **adductor magnus** is the **Sumo Deadlift**. Here’s how to perform it:
1. **Starting Position**: Stand with your feet wider than shoulder-width apart, toes pointing slightly outward. Position a barbell or dumbbell on the floor in front of you. If using a barbell, stand so that the bar is over the middle of your feet.
2. **Grip and Setup**: Bend at the hips and knees to lower your body down, keeping your back straight and chest up. Grip the barbell with both hands inside your knees (a narrower grip) or hold the dumbbell with both hands. Your knees should track over your toes, and your shoulders should be slightly in front of the bar.
3. **Movement (Lift)**: Engage your core and push through your heels to lift the weight off the ground, extending your hips and knees simultaneously. Focus on squeezing your inner thighs together as you rise, which engages the adductor magnus.
4. **Contraction**: As you reach the top of the movement, fully extend your hips and squeeze your glutes, while keeping your chest up and shoulders back. The adductor magnus plays a significant role in hip extension and adduction, making this part of the lift particularly effective for targeting the muscle.
5. **Return**: Slowly lower the weight back to the ground by hinging at the hips and bending your knees, maintaining a straight back and controlled movement.
6. **Repetition**: Perform the desired number of repetitions, ensuring that each lift is performed with proper form and focus on the adductor magnus.
The sumo deadlift is particularly effective for targeting the adductor magnus because the wide stance and outward foot position place significant emphasis on the inner thigh muscles, especially during the hip extension and adduction phases of the lift. Strengthening the adductor magnus improves hip stability, enhances lower body strength, and supports better performance in activities that require powerful hip movements, such as lifting, running, and jumping. This exercise is ideal for building a strong and balanced lower body, reducing the risk of injury, and improving overall athletic performance.
Sartorius
The sartorius is the longest muscle in the human body, running diagonally across the front of the thigh, and plays a vital role in facilitating complex leg movements. It originates from the anterior superior iliac spine of the pelvis and extends down to insert on the medial surface of the tibia, just below the knee. The sartorius is unique in its ability to act across both the hip and knee joints, contributing to multiple functions such as hip flexion, abduction, and external rotation, as well as knee flexion. This versatility is evident in actions like crossing the legs, where the sartorius helps lift the leg, turn the knee outward, and bend the knee. Despite its significance in these movements, the sartorius is often underemphasized in standard exercise routines, which typically focus on larger muscles like the quadriceps and hamstrings. However, neglecting the sartorius can lead to imbalances and reduced flexibility, particularly in the hip and knee joints. Incorporating exercises that engage the sartorius, such as lunges with external rotation, leg raises, and stretches that target the inner thigh and hip, is essential for maintaining balanced leg function, improving flexibility, and preventing injuries related to the hip and knee. A well-conditioned sartorius contributes to smoother, more coordinated leg movements and better overall lower body performance.
An effective exercise that specifically targets the **sartorius** muscle is the **Tailor’s Sit (Butterfly Stretch) with Resistance**. Here’s how to perform it:
1. **Starting Position**: Sit on the floor with your back straight and your legs extended in front of you. Bend your knees and bring the soles of your feet together, allowing your knees to drop outward toward the floor. Your legs should form a diamond shape, similar to a tailor’s sit or butterfly stretch.
2. **Movement (Active Stretch and Activation)**: Place your hands on your ankles or feet, and gently pull your feet closer to your groin while keeping your back straight. Allow your knees to lower toward the floor as much as possible. To specifically target the sartorius, gently press down on your knees with your elbows while actively trying to lift your knees upward against the resistance of your hands or a resistance band looped around your thighs.
3. **Contraction**: Focus on engaging the sartorius as you resist the downward pressure. The sartorius is responsible for flexion, abduction, and lateral rotation of the hip, and this exercise activates all of these functions.
4. **Hold**: Hold the contraction for 3 to 5 seconds, then relax and allow your knees to drop slightly further as you deepen the stretch.
5. **Repetition**: Perform the desired number of repetitions, gently pressing down and resisting the movement each time.
The tailor’s sit with resistance is particularly effective for targeting the sartorius because it combines an active stretch with resistance, engaging the muscle in its roles of hip flexion, abduction, and lateral rotation. Strengthening the sartorius improves hip mobility, enhances coordination in leg movements, and supports the overall function of the hip and knee joints. This exercise is beneficial for athletes and anyone looking to improve flexibility and strength in the hip region, particularly in activities that involve crossing the legs or dynamic lower body movements.
Popliteus
The popliteus is a small but crucial muscle located at the back of the knee joint, playing a vital role in knee stability and movement. It originates from the lateral condyle of the femur (thigh bone) and the lateral meniscus of the knee and inserts into the posterior surface of the tibia (shin bone). Despite its modest size, the popliteus is essential for unlocking the knee from a fully extended position—a movement known as knee flexion initiation. This action is critical when transitioning from standing to walking or running, as it allows the knee to bend smoothly. Additionally, the popliteus assists in medial rotation of the tibia when the leg is not bearing weight, and lateral rotation of the femur on the tibia when the foot is planted, which is important for stabilizing the knee during activities like walking, running, and changing directions. The popliteus also plays a protective role by helping to prevent the knee from over-rotating, thereby reducing the risk of injury. However, it is often overlooked in traditional lower body workouts that focus on larger muscles such as the quadriceps and hamstrings. Strengthening the popliteus through targeted exercises like hamstring curls, resisted knee flexion, and stability exercises can improve knee function, enhance joint stability, and reduce the likelihood of knee injuries. Proper care of the popliteus is essential for maintaining healthy knee mechanics, particularly for athletes and individuals who engage in activities that place significant stress on the knees.
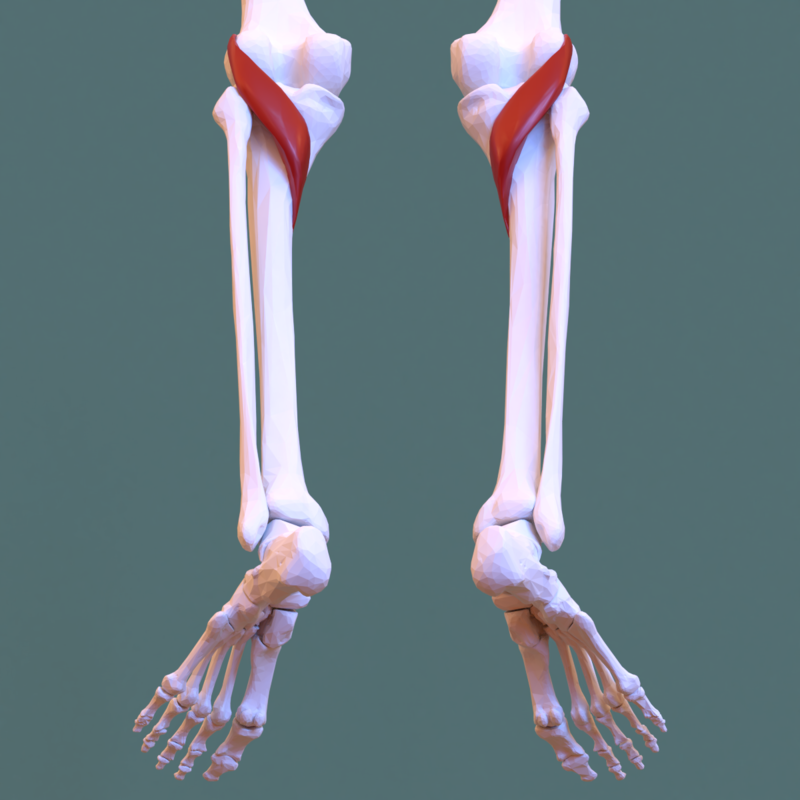
An effective exercise that specifically targets the popliteus muscle is the Seated Leg Curl with Internal Rotation. Here’s how to perform it:
1. Starting Position: Sit on a leg curl machine with your back against the pad and your legs extended straight out in front of you. Position your feet under the padded lever, with the machine set so that your knees are aligned with the machine’s axis of rotation.
2. Internal Rotation: Before starting the leg curl, slightly rotate your feet inward (internal rotation). This position emphasizes the popliteus, which is involved in knee flexion and internal rotation of the tibia.
3. Movement (Leg Curl): Slowly curl your legs, bending your knees to bring your heels toward your glutes. Focus on the movement coming from the knee joint, specifically engaging the popliteus muscle.
4. Contraction: At the bottom of the movement, when your knees are fully bent, hold the position for a moment, feeling the contraction in the popliteus at the back of your knee.
5. Return: Slowly extend your legs back to the starting position with control, ensuring you maintain the internal rotation throughout the movement.
6. Repetition: Perform the desired number of repetitions, maintaining focus on the internal rotation to target the popliteus effectively.
The seated leg curl with internal rotation is particularly effective for targeting the popliteus because it engages the muscle during its primary functions—knee flexion and internal rotation of the tibia. Strengthening the popliteus can improve knee stability, enhance the coordination of knee movements, and reduce the risk of knee injuries, especially in activities that involve sudden changes in direction or twisting motions. This exercise is particularly beneficial for athletes and individuals recovering from knee injuries who need to improve the stability and function of the knee joint.
Tensor Fasciae Latae
The tensor fasciae latae (TFL) is a small yet important muscle located on the outer thigh, playing a significant role in hip stability and movement. It originates from the anterior aspect of the iliac crest and the anterior superior iliac spine of the pelvis, and it inserts into the iliotibial (IT) band, a thick band of connective tissue that runs down the outside of the thigh to the lateral condyle of the tibia. The primary functions of the TFL include hip flexion, abduction, and internal rotation. It is also crucial in stabilizing the pelvis during activities such as walking, running, and balancing on one leg, as it helps maintain proper alignment of the pelvis and lower extremity. The TFL works in concert with the gluteus medius and gluteus minimus to stabilize the hip, especially during weight-bearing activities. Despite its importance, the TFL can become overactive or tight, particularly in individuals who sit for extended periods or have imbalances in their hip muscles. This tightness can contribute to issues like IT band syndrome, which causes pain along the outside of the knee. To maintain a healthy TFL, it is essential to incorporate stretching, foam rolling, and strengthening exercises that target the surrounding muscles, such as the glutes and hip flexors. Proper care of the TFL enhances hip mobility, improves lower body stability, and helps prevent injuries related to the hip and knee, contributing to overall lower body function and performance.
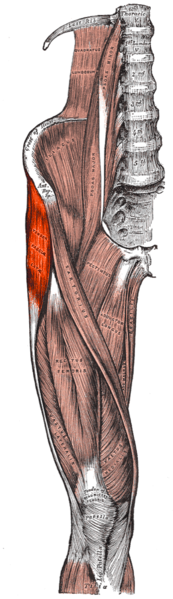
An effective exercise that specifically targets the tensor fasciae latae (TFL) is the Side-Lying Leg Abduction with Internal Rotation. Here’s how to perform it:
1. Starting Position: Lie on your side on a flat surface, such as a mat, with your legs extended straight and stacked on top of each other. Rest your head on your bottom arm, and place your top hand on the floor in front of you for stability. Your body should be in a straight line from head to heels.
2. Internal Rotation: Rotate your top leg slightly inward, so your toes point down toward the floor. This internal rotation engages the TFL more effectively during the movement.
3. Movement (Leg Abduction): Slowly lift your top leg upward toward the ceiling, keeping it straight and maintaining the internal rotation. Focus on using the TFL to lift your leg, which is responsible for hip abduction and internal rotation.
4. Contraction: At the top of the movement, when your leg is lifted as high as comfortable, hold the position for a moment to fully engage the TFL.
5. Return: Slowly lower your leg back to the starting position with control, resisting the urge to let it drop quickly.
6. Repetition: Perform the desired number of repetitions on one side, then switch to lie on the other side and repeat the exercise to target the TFL on the opposite leg.
The side-lying leg abduction with internal rotation is particularly effective for isolating the tensor fasciae latae because it combines hip abduction with internal rotation, the primary functions of the TFL. Strengthening the TFL helps improve hip stability, enhances lateral hip strength, and supports the function of the iliotibial (IT) band. This exercise is beneficial for athletes, runners, and individuals looking to improve hip mobility and reduce the risk of hip and knee injuries associated with weak or imbalanced hip muscles.
Gluteus Medius
The gluteus medius is a crucial muscle located on the outer surface of the pelvis, playing a vital role in hip stability, movement, and overall lower body function. It originates from the outer surface of the ilium, just below the iliac crest, and inserts into the lateral aspect of the greater trochanter of the femur. The gluteus medius is primarily responsible for hip abduction, which involves moving the leg away from the body’s midline, and it also plays a key role in internal and external rotation of the hip. One of its most important functions is stabilizing the pelvis during activities such as walking, running, and standing on one leg. When the gluteus medius is strong and functioning properly, it prevents the pelvis from tilting to the opposite side during these movements, which is essential for maintaining balance and proper alignment. Despite its importance, the gluteus medius is often undertrained in traditional lower body workouts that focus more on the larger gluteus maximus or the quadriceps. Weakness or dysfunction in the gluteus medius can lead to issues such as hip pain, lower back pain, and knee problems, as other muscles may compensate for its inadequacy. Strengthening the gluteus medius through targeted exercises like side-lying leg raises, clamshells, and lateral band walks is essential for enhancing hip stability, improving overall lower body mechanics, and preventing injuries. A well-conditioned gluteus medius contributes to better balance, more efficient movement, and reduced risk of injury during both athletic activities and everyday movements.
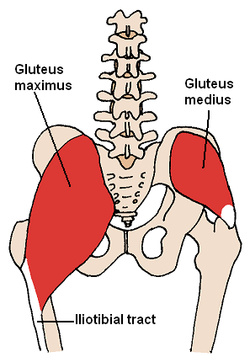
An effective exercise that specifically targets the gluteus medius is the Clamshell. Here’s how to perform it:
1. Starting Position: Lie on your side on a mat with your legs stacked and your knees bent at a 90-degree angle. Your head should rest on your bottom arm, and your top arm can be placed on your hip or on the floor in front of you for support. Your heels should be in line with your hips.
2. Movement (Clamshell Opening): Keeping your feet together, slowly lift your top knee upward as far as you can without moving your pelvis or lower back. Your legs should resemble an opening clamshell. Focus on using the gluteus medius to lift the knee while keeping your core engaged.
3. Contraction: At the top of the movement, when your knee is fully lifted, pause and squeeze the gluteus medius to maximize the muscle contraction.
4. Return: Slowly lower your knee back to the starting position with control, ensuring that your feet stay together and your pelvis remains stable.
5. Repetition: Perform the desired number of repetitions on one side, then switch to the other side and repeat the exercise to target the gluteus medius on the opposite hip.
The clamshell exercise is particularly effective for isolating and strengthening the gluteus medius because it directly targets the muscle’s role in hip abduction and stabilization. Strengthening the gluteus medius helps improve hip stability, enhances balance, and reduces the risk of lower body injuries, particularly in the knees and hips. This exercise is especially beneficial for runners, athletes, and anyone looking to improve lateral hip strength and prevent issues related to weak or imbalanced hip muscles.
Gluteus Minimus
The gluteus minimus is the smallest of the three gluteal muscles, located beneath the gluteus medius on the outer surface of the pelvis, and it plays a crucial role in hip stability and movement. This muscle originates from the outer surface of the ilium, below the origin of the gluteus medius, and inserts into the anterior part of the greater trochanter of the femur. The gluteus minimus is primarily responsible for hip abduction, moving the leg away from the body’s midline, and it also assists in internal rotation of the hip. One of its key functions is stabilizing the pelvis during weight-bearing activities, such as walking, running, and standing on one leg, working in tandem with the gluteus medius to prevent the pelvis from dropping on the opposite side. Despite its importance, the gluteus minimus is often overlooked in traditional strength training routines, which can lead to muscle imbalances and contribute to hip, knee, or lower back pain. When the gluteus minimus is weak or dysfunctional, it can compromise hip stability, leading to inefficient movement patterns and an increased risk of injury. Strengthening the gluteus minimus through exercises like side-lying leg raises, clamshells, and lateral band walks is essential for maintaining hip stability, enhancing lower body mechanics, and preventing injuries. A well-functioning gluteus minimus supports better balance, more effective movement, and a lower risk of injury during both athletic activities and daily life.

An effective exercise that specifically targets the gluteus minimus is the Side-Lying Hip Abduction. Here’s how to perform it:
1. Starting Position: Lie on your side on a flat surface or mat, with your legs extended straight and stacked on top of each other. Rest your head on your bottom arm, and place your top hand on the floor in front of you for stability. Ensure your body is in a straight line from head to heels.
2. Movement (Hip Abduction): Slowly lift your top leg upward toward the ceiling, keeping your leg straight and your foot flexed. The key is to maintain a slight inward rotation of the foot (pointing your toes slightly downward) to engage the gluteus minimus more effectively.
3. Contraction: Lift your leg as high as comfortable without tilting your pelvis or rolling backward. At the top of the movement, pause and squeeze the gluteus minimus to fully engage the muscle.
4. Return: Slowly lower your leg back to the starting position with control, resisting the urge to let it drop quickly.
5. Repetition: Perform the desired number of repetitions on one side, then switch to the other side and repeat the exercise to target the gluteus minimus on the opposite hip.
The side-lying hip abduction is particularly effective for isolating the gluteus minimus because it emphasizes the muscle’s role in hip abduction and stabilization. The gluteus minimus is crucial for maintaining hip stability, especially during weight-bearing activities like walking, running, and balancing on one leg. Strengthening this muscle helps prevent hip, knee, and lower back injuries by promoting balanced and stable hip function. This exercise is beneficial for anyone looking to improve hip strength, enhance athletic performance, or maintain overall lower body stability.
Peroneals (Fibularis Muscles)
The peroneals, also known as the fibularis muscles, are a group of three muscles located on the outer side of the lower leg that play a crucial role in foot and ankle stability, as well as in facilitating movement. The three muscles in this group are the peroneus longus, peroneus brevis, and peroneus tertius. The peroneus longus and brevis originate from the fibula, the smaller bone of the lower leg, and insert into the bones of the foot, while the peroneus tertius, which is often less developed or even absent in some people, extends from the lower fibula to the base of the fifth metatarsal. These muscles are primarily responsible for eversion of the foot, which means turning the sole outward, away from the midline of the body. They also contribute to plantarflexion, pointing the toes downward, especially when the foot is in a weight-bearing position. The peroneals are essential for stabilizing the ankle, particularly during activities that involve lateral movements, such as running on uneven surfaces, cutting, and pivoting in sports. Despite their importance, the peroneals are often undertrained, which can lead to imbalances and an increased risk of ankle sprains or chronic ankle instability. Strengthening the peroneals through targeted exercises, such as resisted ankle eversion, calf raises, and balance work, is crucial for improving ankle stability, enhancing athletic performance, and reducing the likelihood of injuries. Well-conditioned peroneals contribute to better overall foot and ankle mechanics, supporting safer and more effective movement during both everyday activities and sports.
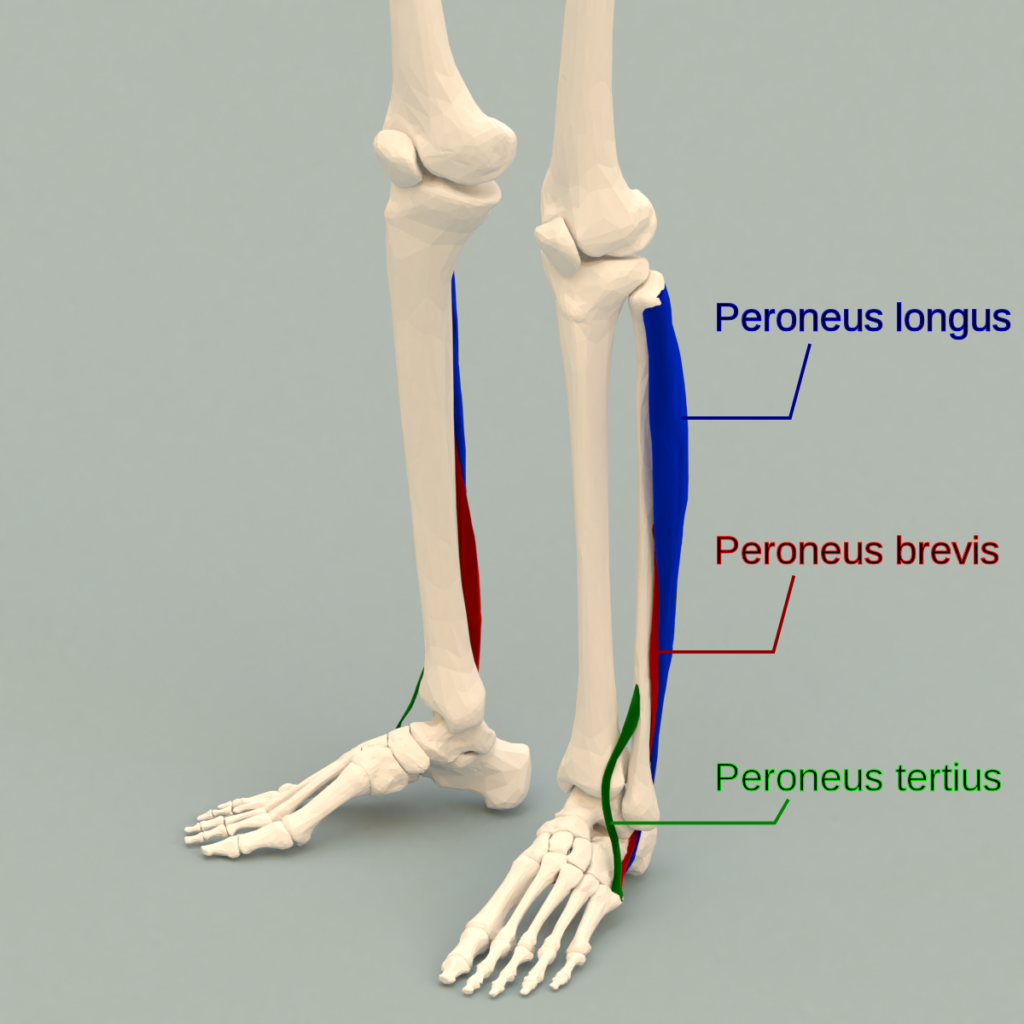
An effective exercise that specifically targets the peroneal muscles (also known as fibularis muscles) is the Resisted Eversion with a Resistance Band. Here’s how to perform it:
1. Starting Position: Sit on the floor or a bench with your legs extended straight out in front of you. Loop a resistance band around the ball of one foot, holding the other end of the band in your hands or securing it to a sturdy object to create tension.
2. Anchor the Band: Cross your opposite leg over the working leg so that the resistance band is anchored from the outside of your foot. The band should be pulling your foot inward (toward the midline of your body).
3. Movement (Eversion): Slowly push your foot outward against the resistance of the band, moving your foot away from the midline of your body. This outward movement is known as eversion and specifically targets the peroneal muscles.
4. Contraction: As you push your foot outward, focus on engaging the peroneal muscles along the outer side of your lower leg. Hold the position for a brief moment when you reach the maximum range of motion.
5. Return: Slowly return your foot to the starting position, controlling the inward movement against the resistance.
6. Repetition: Perform the desired number of repetitions on one foot, then switch to the other foot and repeat the exercise to target the peroneal muscles on the opposite leg.
The resisted eversion exercise is particularly effective for targeting the peroneal muscles because it isolates their primary function, which is to evert the foot (turning the sole outward). Strengthening the peroneals helps improve ankle stability, reduce the risk of ankle sprains, and enhance balance, particularly during activities that involve lateral movements. This exercise is beneficial for athletes, runners, and anyone looking to strengthen the muscles that support and stabilize the ankle.
Tibialis Posterior
The tibialis posterior is a crucial muscle located in the deep posterior compartment of the lower leg, playing a vital role in foot and ankle stability. It originates from the posterior surfaces of the tibia and fibula, as well as the interosseous membrane between them, and runs down behind the medial malleolus (the bony prominence on the inside of the ankle) to insert into the navicular and medial cuneiform bones of the foot, with extensions to several other tarsal and metatarsal bones. The primary function of the tibialis posterior is to support the arch of the foot and control foot inversion, which involves turning the sole of the foot inward. It also assists in plantarflexion, pointing the toes downward, particularly during activities like walking, running, and jumping. This muscle is critical for maintaining the integrity of the medial longitudinal arch of the foot, helping to prevent conditions such as flat feet (pes planus) and associated problems like overpronation, which can lead to knee, hip, and lower back pain. Despite its importance, the tibialis posterior is often overlooked in traditional exercise routines, which can result in weakness or dysfunction, contributing to foot and ankle instability. Strengthening the tibialis posterior through exercises like resisted foot inversion, calf raises with an inward focus, and balance work on unstable surfaces is essential for maintaining strong arches, improving foot mechanics, and preventing injuries. A well-conditioned tibialis posterior enhances overall foot stability, supports better alignment of the lower body, and reduces the risk of overuse injuries in the lower extremities.
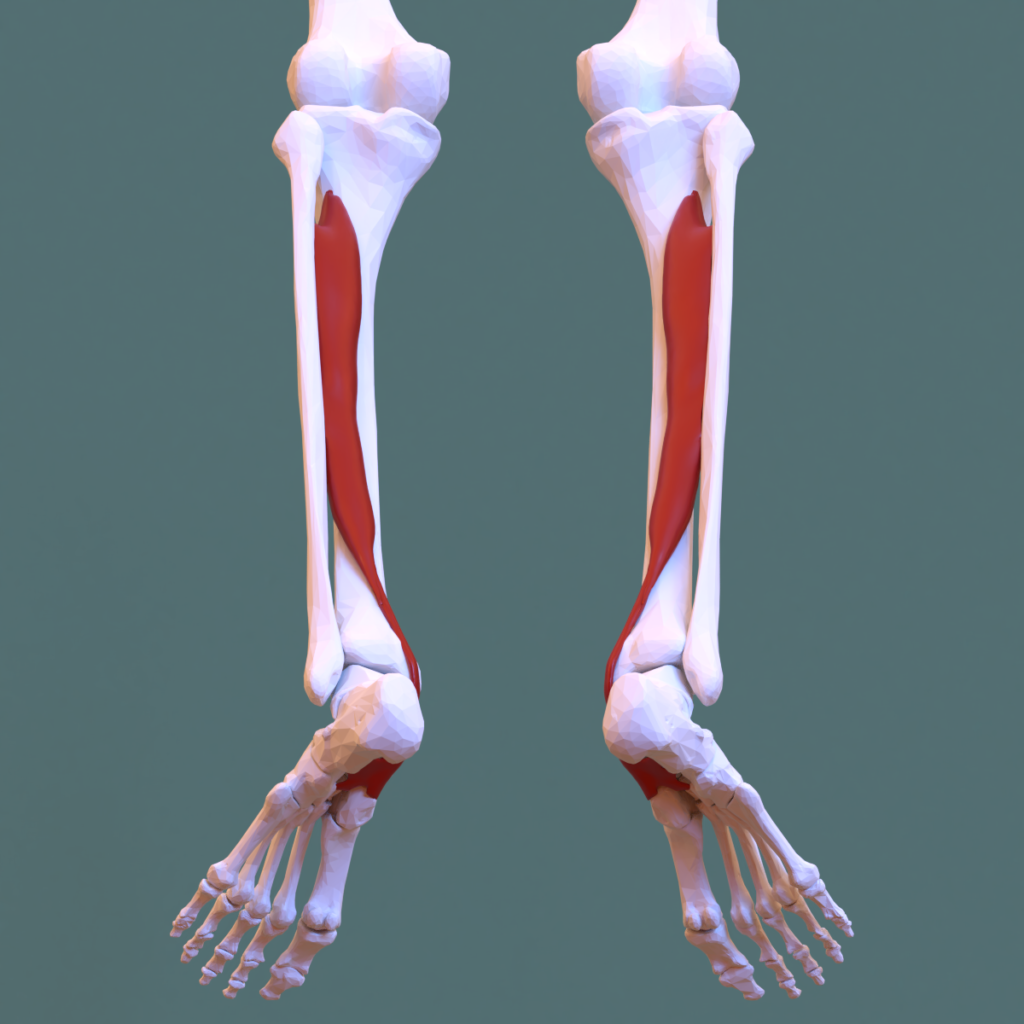
An effective exercise that specifically targets the tibialis posterior muscle is the Heel Raise with Inversion. Here’s how to perform it:
1. Starting Position: Stand with your feet hip-width apart near a wall or a sturdy surface for balance. You can also perform this exercise on a step or an elevated surface to increase the range of motion. Your toes should be pointing forward.
2. Movement (Heel Raise): Slowly lift your heels off the ground, rising onto the balls of your feet. As you lift your heels, focus on slightly inverting your feet—this means turning the soles of your feet inward toward each other. This inward movement engages the tibialis posterior.
3. Contraction: At the top of the movement, when you are fully on your toes and your feet are inverted, hold the position for a brief moment to maximize the contraction in the tibialis posterior.
4. Return: Slowly lower your heels back to the starting position, maintaining control and keeping the inward foot position until your heels touch the ground.
5. Repetition: Perform the desired number of repetitions, ensuring that each lift emphasizes both the heel raise and the slight inward rotation of the feet.
The heel raise with inversion is particularly effective for isolating the tibialis posterior because it combines plantarflexion (heel raising) with inversion, the primary functions of this muscle. Strengthening the tibialis posterior is crucial for supporting the arch of the foot, improving ankle stability, and preventing conditions such as flat feet or overpronation. This exercise is particularly beneficial for runners, athletes, and individuals who need to maintain strong, stable feet and ankles to prevent injuries and improve performance.
Tibialis Anterior
The tibialis anterior is a prominent muscle located on the front of the lower leg, playing a crucial role in foot and ankle movement as well as overall lower limb function. It originates from the lateral surface of the tibia and the interosseous membrane, running down the leg to insert into the medial cuneiform and the base of the first metatarsal bone in the foot. The primary function of the tibialis anterior is dorsiflexion, which involves lifting the foot upwards toward the shin, a movement essential for walking, running, and controlling the placement of the foot during heel strike. Additionally, the tibialis anterior contributes to foot inversion, where the sole of the foot turns inward, helping to stabilize the foot during various activities. This muscle is particularly important for preventing foot slap (uncontrolled dropping of the foot) during gait, ensuring a smooth and efficient walking pattern. Despite its vital role, the tibialis anterior is often underemphasized in traditional strength training routines, which tend to focus more on the larger calf muscles. Weakness in the tibialis anterior can lead to conditions such as shin splints, foot drop, and overpronation, which can contribute to further issues up the kinetic chain, affecting the knees, hips, and lower back. Strengthening the tibialis anterior through exercises like toe raises, resisted dorsiflexion, and walking on heels is essential for maintaining proper foot mechanics, enhancing balance, and preventing injuries related to the lower leg and foot. A strong tibialis anterior supports efficient movement and helps protect the lower extremities during both everyday activities and more intense physical pursuits.
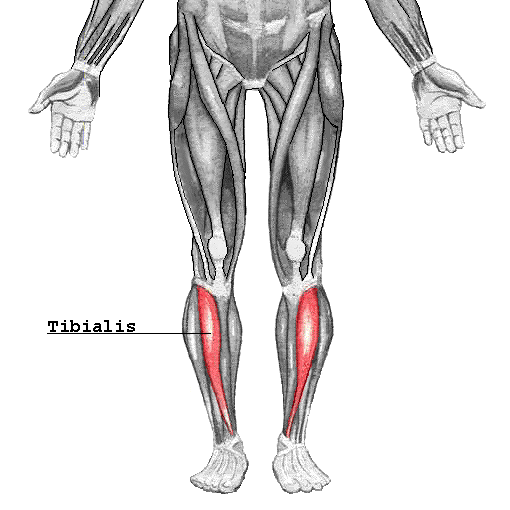
An effective exercise that specifically targets the tibialis anterior is the Toe Raise (Dorsiflexion). Here’s how to perform it:
1. Starting Position: Stand upright with your back against a wall for support, and your feet hip-width apart. Your heels should be touching the ground, and your toes should be pointing forward.
2. Movement (Toe Raise): Slowly lift your toes and the balls of your feet off the ground while keeping your heels firmly planted on the floor. Focus on using the tibialis anterior to lift your toes toward your shins (dorsiflexion).
3. Contraction: At the top of the movement, when your toes are fully lifted, hold the position for a brief moment to maximize the contraction in the tibialis anterior.
4. Return: Slowly lower your toes back to the starting position with control, ensuring that you maintain a smooth, controlled movement.
5. Repetition: Perform the desired number of repetitions. To increase the intensity, you can hold a light weight or resistance band around your toes, or perform the exercise on one leg at a time.
The toe raise is particularly effective for targeting the tibialis anterior because it directly engages the muscle in its primary function of dorsiflexion, where the foot is lifted toward the shin. Strengthening the tibialis anterior helps improve ankle stability, enhance foot control, and prevent common issues like shin splints, which are often caused by weak or overworked tibialis anterior muscles. This exercise is beneficial for runners, athletes, and anyone looking to improve lower leg strength and prevent injuries related to the foot and ankle.
Flexor Hallucis Longus
The flexor hallucis longus (FHL) is a deep muscle located in the posterior compartment of the lower leg, playing a critical role in foot movement and stability, particularly in activities involving the big toe. It originates from the posterior surface of the fibula and the interosseous membrane, running down the leg and passing through the tarsal tunnel before inserting into the base of the distal phalanx of the big toe. The primary function of the FHL is to flex the big toe, an action essential for pushing off the ground during walking, running, and jumping. Additionally, the FHL assists in plantarflexion of the foot, helping to point the toes downward, and contributes to maintaining the medial longitudinal arch of the foot, which is vital for foot stability and balance. This muscle is particularly important for athletes, as it provides the power and control needed for explosive movements that involve the big toe, such as sprinting and jumping. Despite its importance, the FHL is often overlooked in traditional strength training routines, which can lead to weakness or tightness, contributing to conditions like plantar fasciitis, big toe injuries, and decreased foot stability. Strengthening and stretching the FHL through exercises like toe curls, resisted big toe flexion, and specific calf stretches can help maintain proper foot mechanics, enhance performance in sports and daily activities, and prevent injuries related to the big toe and arch. A well-conditioned flexor hallucis longus supports efficient and powerful movement, particularly in dynamic activities that require strong toe push-off.
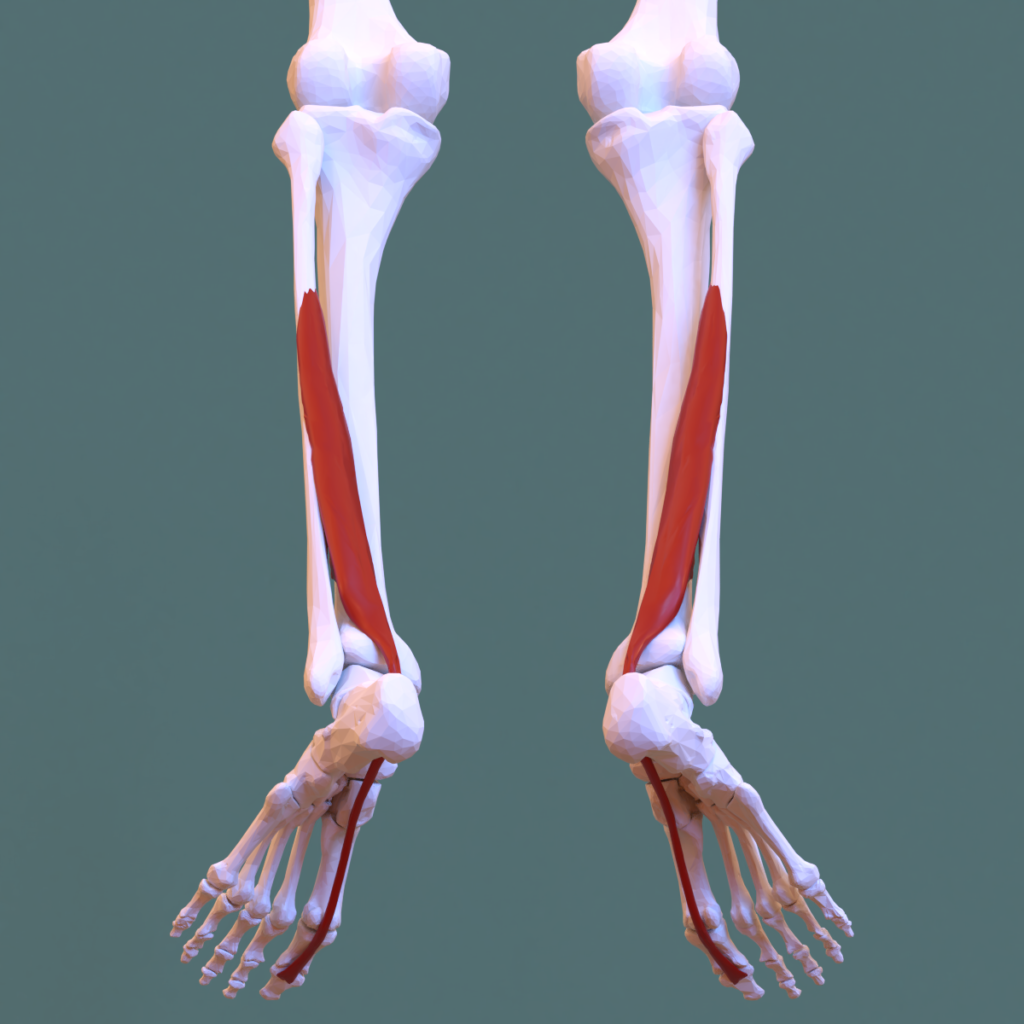
An effective exercise that specifically targets the flexor hallucis longus (FHL) is the Towel Scrunches. Here’s how to perform it:
1. Starting Position: Sit on a chair with your feet flat on the floor. Place a small towel on the floor in front of you, so the edge of the towel is just beneath your toes. Your heels should remain in contact with the floor throughout the exercise.
2. Movement (Toe Flexion): Using only the toes of one foot, try to scrunch the towel by curling your toes, pulling the towel toward you. Focus on using your big toe, as the flexor hallucis longus is primarily responsible for flexing the big toe.
3. Contraction: As you curl the towel with your toes, focus on the flexor hallucis longus, which runs along the bottom of the foot and controls the movement of the big toe. Hold the contraction for a moment when the towel is fully scrunched.
4. Release: Relax your toes, letting the towel go. Repeat the curling motion several times with one foot before switching to the other foot.
5. Repetition: Perform 10-15 scrunches on each foot. To increase the intensity, you can place a small weight, like a book or can, on the towel to add resistance.
The towel scrunch exercise is particularly effective for targeting the flexor hallucis longus because it isolates the muscle’s role in flexing the big toe and supporting the arch of the foot. Strengthening the FHL is essential for improving foot stability, especially in activities that involve pushing off with the toes, such as running, jumping, and dancing. This exercise is beneficial for athletes and anyone looking to enhance foot strength, reduce the risk of injuries like plantar fasciitis, and improve overall foot function.
Vastus Medialis Oblique (VMO)
The vastus medialis oblique (VMO) is a specialized portion of the vastus medialis muscle, located on the inner part of the thigh, and is an integral component of the quadriceps group. The VMO originates from the medial aspect of the femur and inserts into the quadriceps tendon, which attaches to the patella (kneecap) and extends to the tibia via the patellar tendon. The unique fiber orientation of the VMO, which runs obliquely towards the patella, plays a crucial role in stabilizing the patella and ensuring its proper alignment during knee extension. This function is essential for preventing lateral tracking of the patella, which can lead to knee pain, instability, and conditions such as patellofemoral pain syndrome. The VMO is particularly active during the last 15 to 20 degrees of knee extension, making it critical for activities like walking, running, squatting, and climbing stairs. Despite its importance, the VMO is often undertrained or neglected in traditional lower body workouts, leading to imbalances within the quadriceps that can increase the risk of knee injuries. Strengthening the VMO through targeted exercises like terminal knee extensions, step-ups, and leg presses with a focus on the final phase of extension is essential for enhancing knee stability, improving overall quadriceps strength, and preventing common knee problems. A well-developed VMO contributes to a balanced and resilient knee joint, supporting both athletic performance and everyday activities while reducing the likelihood of injury.
An effective exercise that specifically targets the vastus medialis oblique (VMO) is the Terminal Knee Extension (TKE). Here’s how to perform it:
1. Starting Position: Attach a resistance band to a sturdy anchor point at knee height. Loop the other end of the band around the back of your knee. Stand facing the anchor point, with the band providing resistance as it tries to pull your knee forward.
2. Movement (Knee Extension): Begin with your knee slightly bent, allowing the resistance band to pull your knee forward slightly. From this position, slowly straighten your knee by contracting your quadriceps, focusing on the VMO. As you extend your knee, make sure your foot remains flat on the ground, and your heel stays in contact with the floor.
3. Contraction: As you reach full extension, focus on squeezing the VMO, the teardrop-shaped muscle on the inside of your knee. Hold this fully extended position for a moment to maximize the contraction.
4. Return: Slowly allow your knee to bend again, returning to the starting position under the control of the resistance band.
5. Repetition: Perform the desired number of repetitions on one leg, then switch to the other leg and repeat.
The terminal knee extension is particularly effective for isolating the vastus medialis oblique because it targets the final range of motion in knee extension, where the VMO is most active. Strengthening the VMO is crucial for maintaining proper knee alignment, improving patellar tracking, and preventing or alleviating knee pain, particularly in conditions like patellofemoral pain syndrome. This exercise is highly beneficial for athletes, runners, and anyone looking to improve knee stability and function.
Soleus
The soleus is a powerful muscle located in the posterior compartment of the lower leg, lying beneath the more superficial gastrocnemius muscle, and it plays a vital role in lower body movement and stability. Originating from the upper portions of the tibia and fibula, the soleus runs down the leg to join the Achilles tendon, which attaches to the heel bone (calcaneus). Unlike the gastrocnemius, which crosses both the knee and ankle joints, the soleus only crosses the ankle joint, making it specifically responsible for plantarflexion of the foot when the knee is bent. This action involves pointing the toes downward and is essential for maintaining balance, walking, running, and standing on the toes. The soleus is particularly important for endurance activities, as it is primarily composed of slow-twitch muscle fibers, which are resistant to fatigue and crucial for activities that require prolonged periods of standing or walking. Despite its significance, the soleus is often underemphasized in traditional calf training routines, which typically focus on the more visible gastrocnemius. Weakness in the soleus can lead to decreased lower leg stability, compromised ankle function, and an increased risk of Achilles tendon injuries. Strengthening the soleus through exercises like seated calf raises, bent-knee calf raises, and plantarflexion drills is essential for enhancing lower leg strength, improving balance, and supporting overall lower body function. A well-conditioned soleus contributes to powerful and efficient movement, particularly in activities that require sustained effort or involve repeated foot push-offs, such as running, hiking, and cycling.
An effective exercise that specifically targets the soleus muscle is the Seated Calf Raise. Here’s how to perform it:
1. Starting Position: Sit on a chair or bench with your feet flat on the floor, about hip-width apart. Place a weight (such as a dumbbell or a barbell) across your knees to add resistance. You can also use a seated calf raise machine if available.
2. Foot Position: Ensure that the balls of your feet are resting on the floor, and your heels are slightly hanging off the edge if you’re using a step or platform for increased range of motion.
3. Movement (Calf Raise): Slowly raise your heels off the ground by pressing through the balls of your feet. Focus on the movement coming from your ankle joint, engaging the soleus muscle as you lift your heels.
4. Contraction: At the top of the movement, when your heels are fully raised, hold the position for a brief moment and squeeze the soleus muscle. The seated position minimizes the involvement of the gastrocnemius and emphasizes the soleus.
5. Return: Slowly lower your heels back to the starting position, allowing them to drop below the level of the balls of your feet if you’re on a step, to achieve a full stretch in the soleus.
6. Repetition: Perform the desired number of repetitions, ensuring that each lift is slow and controlled to maximize the engagement of the soleus muscle.
The seated calf raise is particularly effective for targeting the soleus because it isolates this muscle by placing the knee in a bent position, reducing the contribution of the gastrocnemius and emphasizing the soleus. Strengthening the soleus is important for improving ankle stability, enhancing endurance in activities that involve prolonged standing or walking, and supporting the overall function of the lower leg. This exercise is beneficial for athletes, runners, and individuals looking to build strong, stable calves.
Plantaris
The plantaris is a small, slender muscle located in the posterior compartment of the lower leg, running between the gastrocnemius and the soleus muscles. Despite its relatively small size and thin, tendon-like structure, the plantaris plays a role in the movement and stability of the ankle and knee joints. The muscle originates from the lateral supracondylar ridge of the femur, just above the knee, and extends down the leg, inserting into the calcaneus (heel bone) via the Achilles tendon, alongside the gastrocnemius and soleus. The primary functions of the plantaris include assisting with plantarflexion of the foot, which involves pointing the toes downward, and aiding in knee flexion. However, due to its small size and the fact that its actions are often overshadowed by the larger and more powerful gastrocnemius and soleus muscles, the plantaris is sometimes considered a vestigial muscle, meaning it may not be as functionally significant in humans as it once was in our evolutionary history. Despite this, the plantaris can still contribute to overall calf strength and ankle stability, particularly in activities that involve sudden or explosive movements, such as sprinting or jumping. It is also prone to injury, especially during rapid acceleration or deceleration, leading to what is sometimes called “tennis leg,” a condition characterized by a sudden pain in the calf. While the plantaris is not typically the focus of targeted exercises, maintaining the health and flexibility of the entire calf complex, including the plantaris, through regular stretching and strengthening exercises is important for reducing the risk of injury and supporting efficient lower leg function.
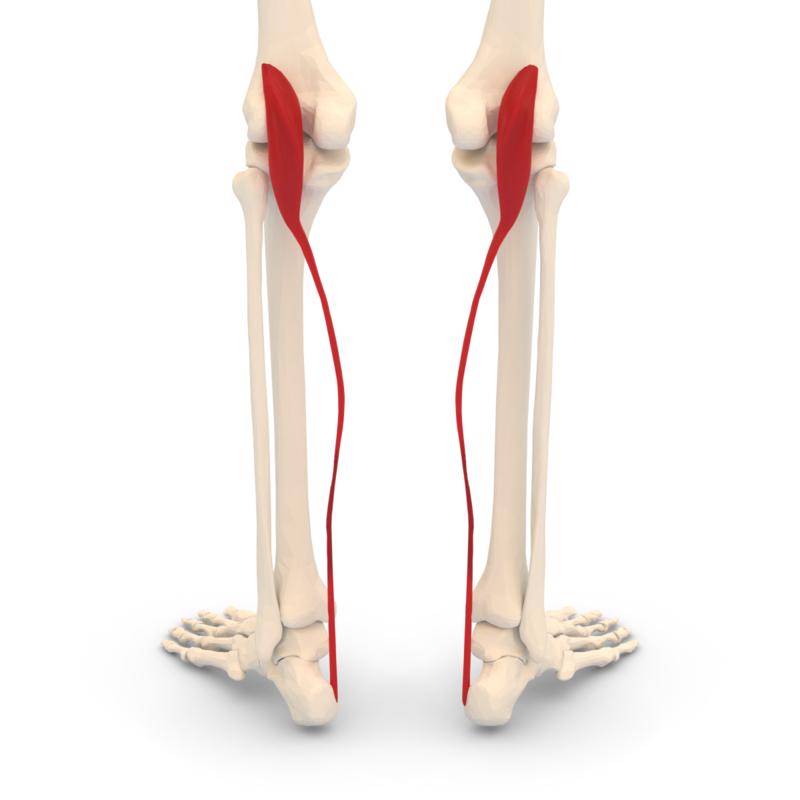
An effective exercise that can help target the plantaris muscle, although it is a small and less commonly isolated muscle, is the Standing Calf Raise with a Slight Knee Bend. This exercise can help engage the plantaris by focusing on both the gastrocnemius and soleus while incorporating a slight bend in the knee, which helps to activate the plantaris due to its anatomical position. Here’s how to perform it:
1. Starting Position: Stand upright with your feet hip-width apart. You can hold onto a sturdy surface like a wall or the back of a chair for balance. Keep your knees slightly bent to put some tension on the plantaris muscle.
2. Foot Position: Position the balls of your feet on the edge of a step or platform, allowing your heels to hang off the back. If you don’t have a step, you can perform this exercise on flat ground.
3. Movement (Calf Raise): Slowly raise your heels as high as possible by pressing down through the balls of your feet. Focus on maintaining the slight bend in your knees throughout the movement. The plantaris assists with this motion due to its role in both knee flexion and plantarflexion.
4. Contraction: At the top of the movement, hold the position for a brief moment and squeeze your calves, including the plantaris muscle.
5. Return: Slowly lower your heels back down to the starting position, allowing them to drop below the level of the step if you are using one, to achieve a full stretch.
6. Repetition: Perform the desired number of repetitions, maintaining the slight knee bend throughout to keep the plantaris engaged.
Although the plantaris is a small muscle and not typically the primary target in most exercises, this variation of the calf raise can help engage it along with the other calf muscles. Strengthening the plantaris, along with the other muscles in the lower leg, can contribute to better overall calf stability and function, especially in activities involving plantarflexion and knee flexion, such as running or jumping.
Piriformis
The piriformis is a small, pear-shaped muscle located deep within the gluteal region, playing a critical role in hip movement and stability. It originates from the anterior surface of the sacrum, which is the triangular bone at the base of the spine, and extends through the greater sciatic notch to insert into the upper border of the greater trochanter of the femur (thigh bone). The primary functions of the piriformis include external rotation of the hip, abduction of the thigh when the hip is flexed, and stabilization of the hip joint. The piriformis is particularly important in activities that involve lateral movements, such as walking, running, and changing direction, as it helps control the rotation and alignment of the hip and thigh. Despite its crucial role, the piriformis can become tight or irritated, especially in individuals who sit for prolonged periods or engage in repetitive hip movements. This can lead to a condition known as piriformis syndrome, where the muscle compresses the sciatic nerve, causing pain, tingling, or numbness that radiates down the leg. Properly stretching and strengthening the piriformis through exercises like seated piriformis stretches, hip rotator stretches, and targeted strengthening routines is essential for maintaining hip flexibility, preventing sciatic nerve compression, and supporting overall lower body function. A healthy piriformis muscle contributes to smooth, pain-free hip movements and reduces the risk of lower back and leg discomfort, enhancing both athletic performance and daily mobility.
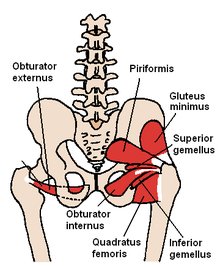
An effective exercise that specifically targets the piriformis muscle is the Piriformis Stretch with External Rotation (also known as the Figure 4 Stretch). Here’s how to perform it:
1. Starting Position: Lie on your back on a mat or flat surface with your knees bent and feet flat on the floor.
2. Cross-Leg Position: Lift your right foot and place your right ankle on your left thigh, just above the knee. Your right knee should be pointing outward, creating a “figure 4” shape with your legs.
3. Movement (Hip Flexion and External Rotation): Reach through your legs and grasp the back of your left thigh (or the front of your shin if you are more flexible) with both hands. Gently pull your left thigh toward your chest while keeping your back and head relaxed on the mat. As you pull, you should feel a stretch in your right buttock and deep into the hip, where the piriformis is located.
4. Contraction and Hold: Hold the stretch for 20-30 seconds, breathing deeply and focusing on relaxing the piriformis. You can gently press your right knee outward with your hand to increase the stretch.
5. Return: Slowly release your left thigh and lower your right foot back to the floor.
6. Repetition: Repeat the stretch on the opposite side by placing your left ankle on your right thigh and pulling your right thigh toward your chest.
While the piriformis stretch with external rotation is a static stretch rather than a strengthening exercise, it is highly effective for targeting the piriformis muscle, especially if it is tight or overactive. Regularly stretching the piriformis can help alleviate tightness, reduce the risk of sciatica caused by piriformis syndrome, and improve hip mobility. This stretch is particularly beneficial for individuals who sit for long periods or engage in activities that involve repetitive hip movements, such as running or cycling.
Posterior chain
The posterior chain refers to a group of muscles located along the backside of the body, extending from the lower back through the glutes, hamstrings, and calves. This muscular chain plays a crucial role in maintaining proper posture, generating power, and facilitating movements that involve hip extension, trunk stabilization, and knee flexion. The primary muscles in the posterior chain include the erector spinae, which supports the spine; the gluteus maximus, which is responsible for hip extension and powerful movements like jumping and sprinting; the hamstrings, which assist in bending the knee and extending the hip; and the calves, which contribute to plantarflexion of the foot and help propel the body forward during walking and running. The posterior chain is essential for overall athletic performance, as it supports explosive movements, stabilizes the lower back during lifting and bending activities, and helps prevent injuries by maintaining balance and alignment. Weakness or imbalances in the posterior chain can lead to issues such as lower back pain, poor posture, reduced power output, and increased risk of injury. Strengthening and conditioning the posterior chain through exercises like deadlifts, hip thrusts, and Romanian deadlifts is vital for optimizing movement efficiency, enhancing athletic performance, and supporting overall functional strength and stability. A well-developed posterior chain not only improves physical performance but also contributes to better posture, reduced injury risk, and enhanced daily functional movement.
Erector Spinae
The erector spinae is a group of muscles that run vertically along the length of the spine, from the sacrum at the base of the spine to the base of the skull, playing a crucial role in maintaining posture and facilitating spinal movements. This muscle group is composed of three main columns: the iliocostalis, longissimus, and spinalis muscles, each contributing to the extension, lateral flexion, and rotation of the spine. The erector spinae muscles are essential for supporting the spine during everyday activities such as bending, lifting, and standing upright, as well as during more intense physical activities like deadlifting and squatting. By stabilizing the vertebral column, the erector spinae helps to protect the spine from injury and ensures efficient movement patterns. Despite its importance, the erector spinae can often become tight or overworked, especially in individuals with poor posture or those who perform repetitive lifting tasks. Conversely, if these muscles are weak, it can lead to lower back pain, poor posture, and an increased risk of spinal injuries. Strengthening the erector spinae through exercises like deadlifts, back extensions, and good mornings is essential for enhancing spinal stability, improving posture, and preventing lower back pain. A strong and well-conditioned erector spinae contributes to a resilient, functional spine that can withstand the demands of both daily life and athletic activities.
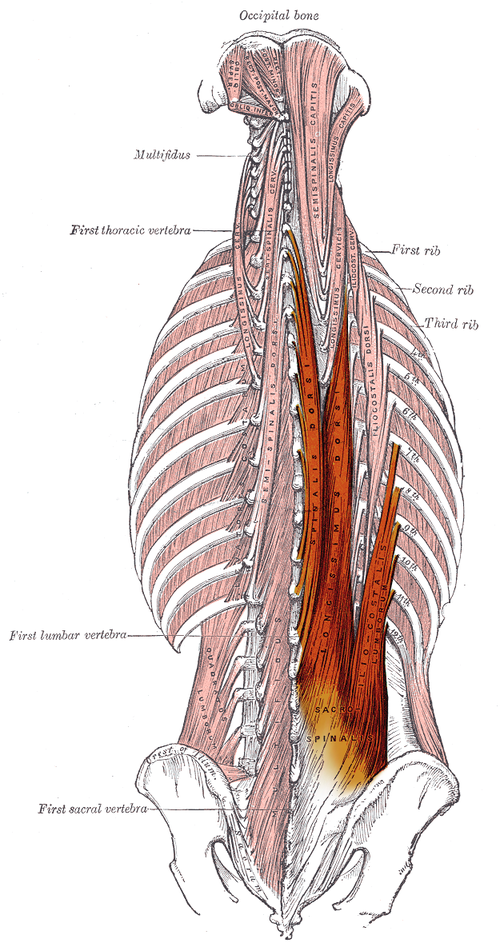
An effective exercise that specifically targets the erector spinae muscles is the Back Extension (Hyperextension). Here’s how to perform it:
1. Starting Position: Lie face down on a hyperextension bench or Roman chair, with your hips positioned at the edge of the pad. Secure your feet under the footpads to stabilize your lower body. If you don’t have access to this equipment, you can also perform the exercise on a flat surface or stability ball.
2. Body Position: Cross your arms over your chest or place your hands behind your head. Keep your spine in a neutral position, with your head aligned with your spine.
3. Movement (Extension): Slowly lower your upper body toward the floor by bending at the hips, keeping your back straight and your core engaged. Lower yourself until your upper body is slightly below parallel to the floor or until you feel a comfortable stretch in your lower back.
4. Contraction: Engage your erector spinae muscles to raise your upper body back up to the starting position, extending your spine. Be sure to lift through the lower back, maintaining a controlled movement throughout. At the top of the movement, squeeze your lower back muscles, focusing on the erector spinae.
5. Return: Slowly lower your upper body back to the starting position with control, avoiding any jerky movements.
6. Repetition: Perform the desired number of repetitions, maintaining proper form and focusing on engaging the erector spinae with each lift.
The back extension is particularly effective for targeting the erector spinae because it isolates the muscle group responsible for extending the spine and maintaining an upright posture. Strengthening the erector spinae is crucial for improving lower back strength, enhancing overall spinal stability, and preventing lower back injuries. This exercise is beneficial for anyone looking to develop a strong and resilient lower back, whether for athletic performance, general fitness, or injury prevention.
Splenius Capitis
The erector spinae is a group of muscles that run vertically along the length of the spine, from the sacrum at the base of the spine to the base of the skull, playing a crucial role in maintaining posture and facilitating spinal movements. This muscle group is composed of three main columns: the iliocostalis, longissimus, and spinalis muscles, each contributing to the extension, lateral flexion, and rotation of the spine. The erector spinae muscles are essential for supporting the spine during everyday activities such as bending, lifting, and standing upright, as well as during more intense physical activities like deadlifting and squatting. By stabilizing the vertebral column, the erector spinae helps to protect the spine from injury and ensures efficient movement patterns. Despite its importance, the erector spinae can often become tight or overworked, especially in individuals with poor posture or those who perform repetitive lifting tasks. Conversely, if these muscles are weak, it can lead to lower back pain, poor posture, and an increased risk of spinal injuries. Strengthening the erector spinae through exercises like deadlifts, back extensions, and good mornings is essential for enhancing spinal stability, improving posture, and preventing lower back pain. A strong and well-conditioned erector spinae contributes to a resilient, functional spine that can withstand the demands of both daily life and athletic activities.
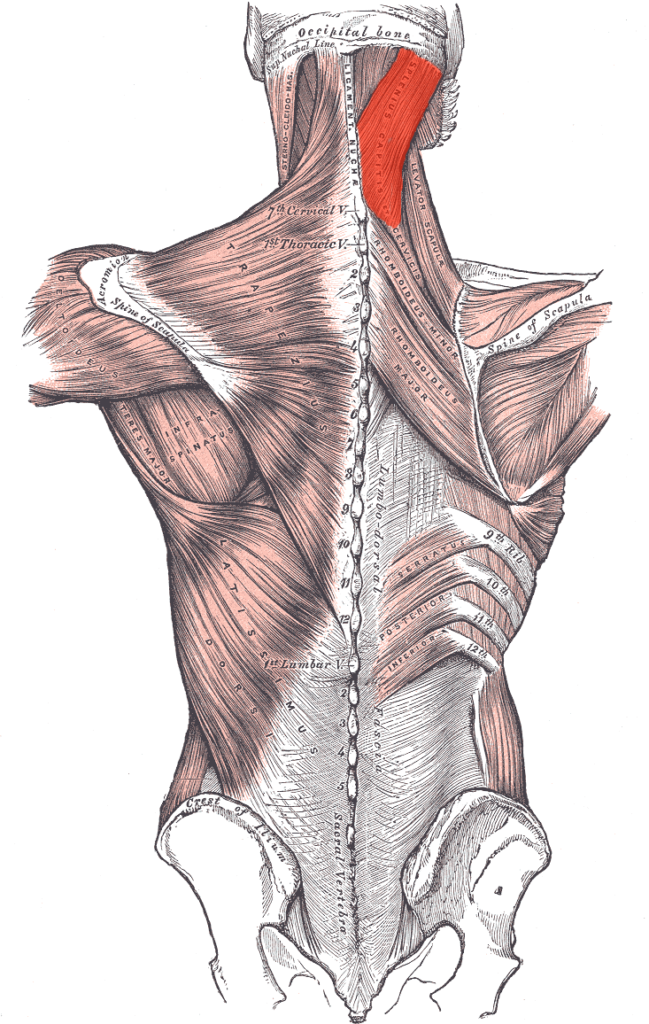
An effective exercise that specifically targets the splenius capitis muscle is the Prone Head Lift (also known as Neck Extension). Here’s how to perform it:
1. Starting Position: Lie face down on a flat surface, such as a bench or mat, with your head hanging off the edge. Your arms can be relaxed at your sides or placed under your chest for support. Keep your body stable, with your neck and head in a neutral position.
2. Movement (Head Lift): Begin by slowly lifting your head upward, extending your neck so that your head moves in line with your spine. Focus on using the muscles at the back of your neck, particularly the splenius capitis, to lift your head.
3. Contraction: At the top of the movement, when your head is fully lifted, hold the position for a brief moment and squeeze the muscles in the back of your neck.
4. Return: Slowly lower your head back to the starting position with control, avoiding any sudden or jerky movements.
5. Repetition: Perform the desired number of repetitions, ensuring each lift is slow and controlled to maximize engagement of the splenius capitis.
For added resistance, you can place a light weight on the back of your head or use your hands to gently add resistance during the head lift.
The prone head lift is particularly effective for targeting the splenius capitis because it focuses on the muscle’s role in extending the neck and assisting with rotation. Strengthening the splenius capitis can help improve neck posture, enhance stability, and reduce the risk of neck pain, particularly for individuals who spend long periods in static positions, such as sitting at a desk. This exercise is beneficial for maintaining a healthy, strong neck and preventing discomfort related to poor posture or muscle imbalances.
Hamstrings
The hamstrings are a group of three powerful muscles located at the back of the thigh, playing a critical role in lower body movement, strength, and stability. This muscle group includes the biceps femoris, semitendinosus, and semimembranosus, all of which originate from the ischial tuberosity of the pelvis and insert into different parts of the lower leg bones, the tibia and fibula. The primary functions of the hamstrings are knee flexion, which involves bending the knee, and hip extension, where the thigh is moved backward. These actions are essential for activities like walking, running, jumping, and squatting, making the hamstrings vital for both athletic performance and everyday movements. Additionally, the hamstrings work in concert with the gluteal muscles to stabilize the pelvis and support the lower back, particularly during activities that involve lifting or bending. Despite their importance, the hamstrings are often tight or prone to injury, particularly in athletes who engage in sprinting or explosive movements, which can lead to strains or tears. Strengthening the hamstrings through exercises like deadlifts, leg curls, and lunges, as well as incorporating regular stretching, is essential for maintaining flexibility, preventing injuries, and enhancing overall lower body power and stability. A well-conditioned hamstring group contributes to balanced muscle development, improved posture, and reduced risk of lower back and knee injuries, supporting efficient and pain-free movement.
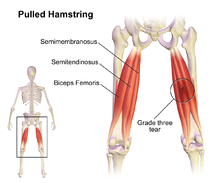
Semitendinosus
The semitendinosus is one of the three muscles that make up the hamstring group, located at the back of the thigh, and plays a crucial role in lower body movement and stability. It originates from the ischial tuberosity of the pelvis, alongside the biceps femoris and semimembranosus, and runs down the thigh to insert into the upper part of the medial surface of the tibia, just below the knee. The semitendinosus is primarily responsible for knee flexion, which involves bending the knee, and hip extension, where the thigh is moved backward. Additionally, it contributes to the medial rotation of the leg when the knee is flexed, helping to stabilize the knee joint during various activities. This muscle is especially important in actions such as running, jumping, and climbing, where powerful leg movements are required. Despite its importance, the semitendinosus, like the other hamstring muscles, can be prone to tightness or injury, particularly in athletes or individuals who perform explosive movements. Strengthening the semitendinosus through targeted exercises like leg curls, deadlifts, and lunges, along with regular stretching, is essential for maintaining flexibility, enhancing lower body strength, and preventing injuries. A well-conditioned semitendinosus contributes to balanced hamstring development, supports knee and hip stability, and reduces the risk of injuries, ensuring efficient and powerful lower body movement.
An effective exercise that specifically targets the semitendinosus muscle, one of the three muscles that make up the hamstrings, is the Single-Leg Romanian Deadlift. Here’s how to perform it:
1. Starting Position: Stand upright with your feet hip-width apart. Hold a dumbbell or kettlebell in the hand opposite the working leg (for example, if you’re working the left leg, hold the weight in your right hand). Keep your knees slightly bent and your core engaged.
2. Movement (Hip Hinge): Shift your weight onto your working leg (the leg on the same side as the semitendinosus you want to target). Slowly hinge at the hips, allowing your non-working leg to lift straight back behind you as you lower the weight toward the floor. Your torso should lower as a unit with your leg, keeping your back flat and your core tight.
3. Contraction: Focus on using your hamstrings, particularly the semitendinosus, to control the movement as you lower your body. When you feel a stretch in your hamstrings or when your torso is parallel to the ground (whichever comes first), pause for a moment.
4. Return: Engage the semitendinosus to return to the starting position by driving your hips forward and bringing your torso back to an upright position. Your non-working leg should return to the ground as you stand up straight.
5. Repetition: Perform the desired number of repetitions on one leg, then switch to the other leg and repeat the exercise to target the semitendinosus on the opposite side.
The single-leg Romanian deadlift is particularly effective for targeting the semitendinosus because it emphasizes hip extension and knee flexion, the primary functions of the hamstrings. The unilateral nature of the exercise also helps to correct imbalances between the hamstrings and improve stability and coordination. This exercise is highly beneficial for athletes and anyone looking to build strong, balanced hamstrings, enhance lower body strength, and reduce the risk of hamstring injuries.
Semimembranosus
The semimembranosus is one of the three muscles that comprise the hamstring group, located at the back of the thigh, and plays a vital role in lower body movement and stability. It originates from the ischial tuberosity of the pelvis, similar to the other hamstring muscles, and runs down the thigh to insert into the posteromedial aspect of the tibia, the larger bone of the lower leg. The semimembranosus is primarily responsible for knee flexion, which involves bending the knee, and hip extension, where the thigh is moved backward. Additionally, it aids in the medial rotation of the leg when the knee is flexed, providing stability to the knee joint during various activities. This muscle is crucial for actions such as running, walking, and jumping, where powerful and coordinated leg movements are essential. Due to its deep location beneath the semitendinosus, the semimembranosus often goes unnoticed, but its strength and flexibility are critical for balanced hamstring function. Like the other hamstrings, the semimembranosus is susceptible to tightness and injury, particularly in activities that involve sudden starts, stops, or changes in direction. Strengthening the semimembranosus through exercises like leg curls, Romanian deadlifts, and lunges, along with regular stretching, is essential for maintaining flexibility, enhancing lower body strength, and preventing injuries. A well-conditioned semimembranosus contributes to overall hamstring health, supports knee and hip stability, and reduces the risk of strains, ensuring smooth and powerful lower body movement.
An effective exercise that specifically targets the semimembranosus muscle, one of the three muscles in the hamstring group, is the Nordic Hamstring Curl. This exercise is excellent for developing strength and resilience in the hamstrings, with a particular focus on the semimembranosus.
Here’s how to perform it:
1. Starting Position: Kneel on a soft surface like a mat, with your feet secured under a stable object or held by a partner. Your knees should be hip-width apart, and your torso should be upright, with your arms crossed over your chest or held in front for balance.
2. Movement (Hamstring Curl): Begin by slowly lowering your upper body toward the ground, keeping your hips extended and your back straight. Control the descent using your hamstrings. The key is to lower your body as slowly as possible, focusing on the eccentric (lengthening) phase, which is where the semimembranosus is heavily engaged.
3. Contraction: As you lower yourself, your hamstrings, including the semimembranosus, will be under increasing tension. Go as far as you can without losing control, ideally until your body is almost parallel to the ground.
4. Assisted Return: Once you reach the lowest point you can control, use your hands to lightly push off the ground and help yourself back to the starting position, or pull yourself back up using your hamstrings if you have the strength. The key is to focus on the lowering phase rather than the upward movement.
5. Repetition: Perform the desired number of repetitions, ensuring each rep is slow and controlled.
The Nordic hamstring curl is particularly effective for targeting the semimembranosus because it emphasizes the muscle’s role in controlling knee flexion under load, which is critical for hamstring function. Strengthening the semimembranosus with this exercise helps improve hamstring strength, enhances lower body stability, and reduces the risk of hamstring strains, particularly in sports that involve sprinting or explosive leg movements. This exercise is challenging but highly beneficial for building resilient and powerful hamstrings.
Gastrocnemius (Medial Head)
The gastrocnemius is the most prominent and superficial muscle of the calf, playing a critical role in lower leg movement, stability, and power. It is a two-headed muscle that originates from the posterior surfaces of the femur’s medial and lateral condyles and descends along the back of the leg to merge with the soleus muscle, forming the Achilles tendon, which attaches to the calcaneus (heel bone). The primary function of the gastrocnemius is plantarflexion of the foot, which involves pointing the toes downward, a movement essential for pushing off the ground during walking, running, and jumping. Additionally, because it crosses the knee joint, the gastrocnemius also contributes to knee flexion. This muscle is particularly important in explosive movements that require a strong push-off, such as sprinting, leaping, and climbing stairs. Despite its strength and visibility, the gastrocnemius is prone to tightness and injury, especially in athletes and active individuals who engage in high-intensity activities. Strengthening the gastrocnemius through exercises like calf raises, jump rope, and sprinting drills, combined with regular stretching, is crucial for maintaining flexibility, preventing calf strains, and enhancing overall lower leg power and stability. A well-conditioned gastrocnemius not only improves athletic performance but also supports daily activities that require robust lower leg function, contributing to efficient and pain-free movement.

An effective exercise that specifically targets the gastrocnemius muscle is the Standing Calf Raise. Here’s how to perform it:
1. Starting Position: Stand upright with your feet hip-width apart. Position the balls of your feet on the edge of a step, platform, or a sturdy surface, with your heels hanging off the back. Hold onto a wall, railing, or other support for balance. You can also perform this exercise on flat ground if no step is available.
2. Movement (Calf Raise): Slowly raise your heels as high as possible by pushing through the balls of your feet, lifting your body upward. Focus on engaging the gastrocnemius muscle, which is responsible for plantarflexion (pointing your toes down).
3. Contraction: At the top of the movement, when your heels are fully lifted, pause and squeeze the gastrocnemius muscle. Hold this position for a moment to maximize the contraction.
4. Return: Slowly lower your heels back down to the starting position. If you’re on a step, allow your heels to drop slightly below the level of the step to achieve a full stretch in the calf muscles.
5. Repetition: Perform the desired number of repetitions, ensuring that each lift and lower is controlled and that you’re focusing on the gastrocnemius muscle throughout the exercise.
6. Variations: To increase the intensity, you can hold a dumbbell in one hand, perform the exercise on one leg at a time, or add more resistance by using a barbell or weight machine.
The standing calf raise is particularly effective for targeting the gastrocnemius because it emphasizes the muscle’s role in plantarflexion when the knee is extended. Strengthening the gastrocnemius helps improve lower leg strength, enhance jumping ability, and support overall lower body performance. This exercise is beneficial for athletes, runners, and anyone looking to build strong, well-defined calves and improve ankle stability.